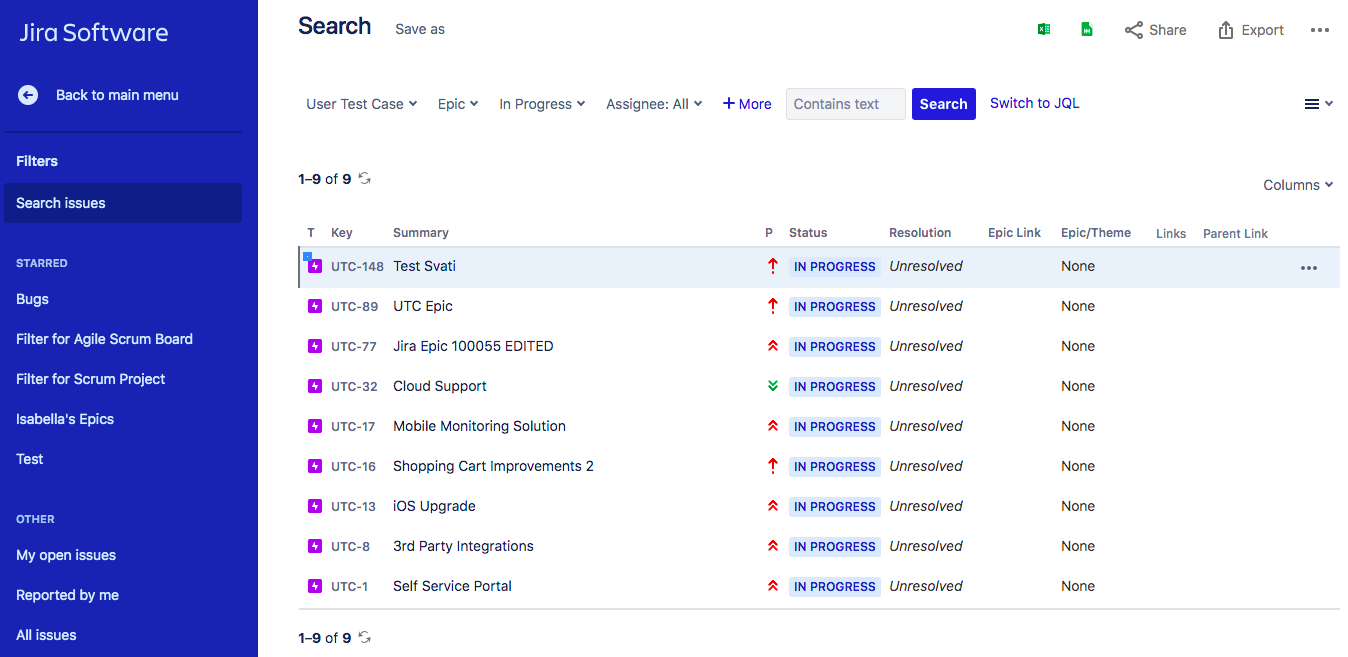
Önceliklendirme için Jira ile Google Sheets'i entegre etmenin 5 yolu
İş listesi önceliklendirmesi için Jira ile Google Sheets'i entegre etmenin beş yöntemini keşfedin. Her yaklaşım, bilinçli kararlar almanıza yardımcı olmak için farklı otomasyon, senkronizasyon ve işlevsellik seviyeleri sunar.
Jira, proje ve görev yönetimi için en yaygın kullanılan araçlardan biridir. Ekipler, ürün geliştirmeyi organize etmek, projeleri takip etmek ve destek masalarını işletmek için Jira projeleri kullanır. Verileri analiz etmek, gösterge panelleri oluşturmak, KPI'ları takip etmek veya öncelikleri hesaplamak için genellikle Jira verilerini Google Sheets'e aktarmanız gerekir.
Jira'yı Google Sheets ile entegre etmenin temel faydalarından biri, iş listenizi dışa aktararak, görevlere ağırlık atayarak, formüller oluşturarak ve toplamları hesaplayarak önceliklendirme yapabilmenizdir.
Önceliklendirme aracı olarak Google Sheets
Google Sheets, nispeten küçük veri hacimleriyle çalışan küçük ekipler için iyi çalışır. Veriler arttıkça sorunlar ortaya çıkar:
- Dosyalar boyut arttıkça yavaşlar
- Formüller esneklikten yoksundur ve manuel ayarlama gerektirir
- Gerçek zamanlı senkronizasyon yoktur
- Veri duplikasyonu oluşur
- Manuel veri bakımı gerekir
- Sınırlı veri görselleştirmesi
- Yerleşik önceliklendirme çerçevesi şablonları yoktur
- Otomatik raporlar veya matrisler yoktur
Karşılaştırma tablosu
| Yöntem | Senkronizasyon Türü | Gerçek Zamanlı | Maliyet | Kurulum Karmaşıklığı | En İyi Kullanım |
|---|---|---|---|---|---|
| Ducalis | 2 yönlü | Evet | Ücretli | Orta | İşbirlikçi önceliklendirmeye ihtiyaç duyan ekipler |
| Airtable | 1 yönlü | Hayır (5 dakika) | Ücretli | Yüksek | Özel uygulamalar geliştiren teknik bilgili ekipler |
| Coda.io | 1 yönlü | Hayır (saatlik) | Ücretli | Orta | Doküman ve elektronik tabloları birleştiren ekipler |
| ProductPlan | 1 yönlü | Hayır (günlük) | Ücretli | Yüksek | Yol haritası oluşturan ürün yöneticileri |
| Notion | 1 yönlü | Hayır (planlanmış) | Ücretli | Yüksek | Hepsi bir arada çalışma alanına ihtiyaç duyan ekipler |
| Jira Cloud eklentisi | 1 yönlü | Hayır (planlanmış) | Ücretsiz | Düşük | Temel ihtiyaçları olan küçük ekipler |
| Manuel CSV dışa aktarma | Yok | Hayır | Ücretsiz | Düşük | Küçük verilerle ara sıra dışa aktarma |
Entegrasyon yöntemleri
Farklı yöntemleri önceliklendirme etkinliğine göre sıralıyoruz.
1. Ducalis — Gerçek zamanlı 2 yönlü senkronizasyon
Ducalis, ekibinizi en önemli öncelikler etrafında hizalanmış tutan işbirlikçi bir önceliklendirme platformudur. Ducalis'i şunlar için kullanın:
- Ürün özelliklerini, blog makalelerini, hipotezleri, hataları ve pazarlama stratejilerini inceleyin ve önceliklendirin
- Gereksiz işi minimize edin
- Özel önceliklendirme çerçeveleri oluşturun veya RICE, ICE, REAN, WSJF ve daha fazlası gibi mevcut modellerden seçim yapın
- Durum senkronizasyon toplantılarında saatler kazanın
- Tüm ekibinizi karar verme sürecine dahil edin ve çeşitli görüşler toplayın
- Takım hizalanması ızgarasıyla hizalanma ve uyumsuzluk alanlarını vurgulayın
- Şirketinizin ihtiyaçlarına göre özelleştirilmiş değerlendirme kriterleri oluşturun
- Belirsiz konular hakkında sorular sorun ve yanlış anlamaları erkenden tespit edin
- Asana, Jira, Trello ve diğer görev takipçileriyle gerçek zamanlı senkronize edin
Entegrasyon prosedürü
Ducalis'i Jira Cloud ile 5 adımda entegre edin:
Adım 1: Jira Cloud'a bağlanın
-
Gösterge panelinde Create Board (Pano Oluştur) düğmesine tıklayarak bir pano oluşturun.
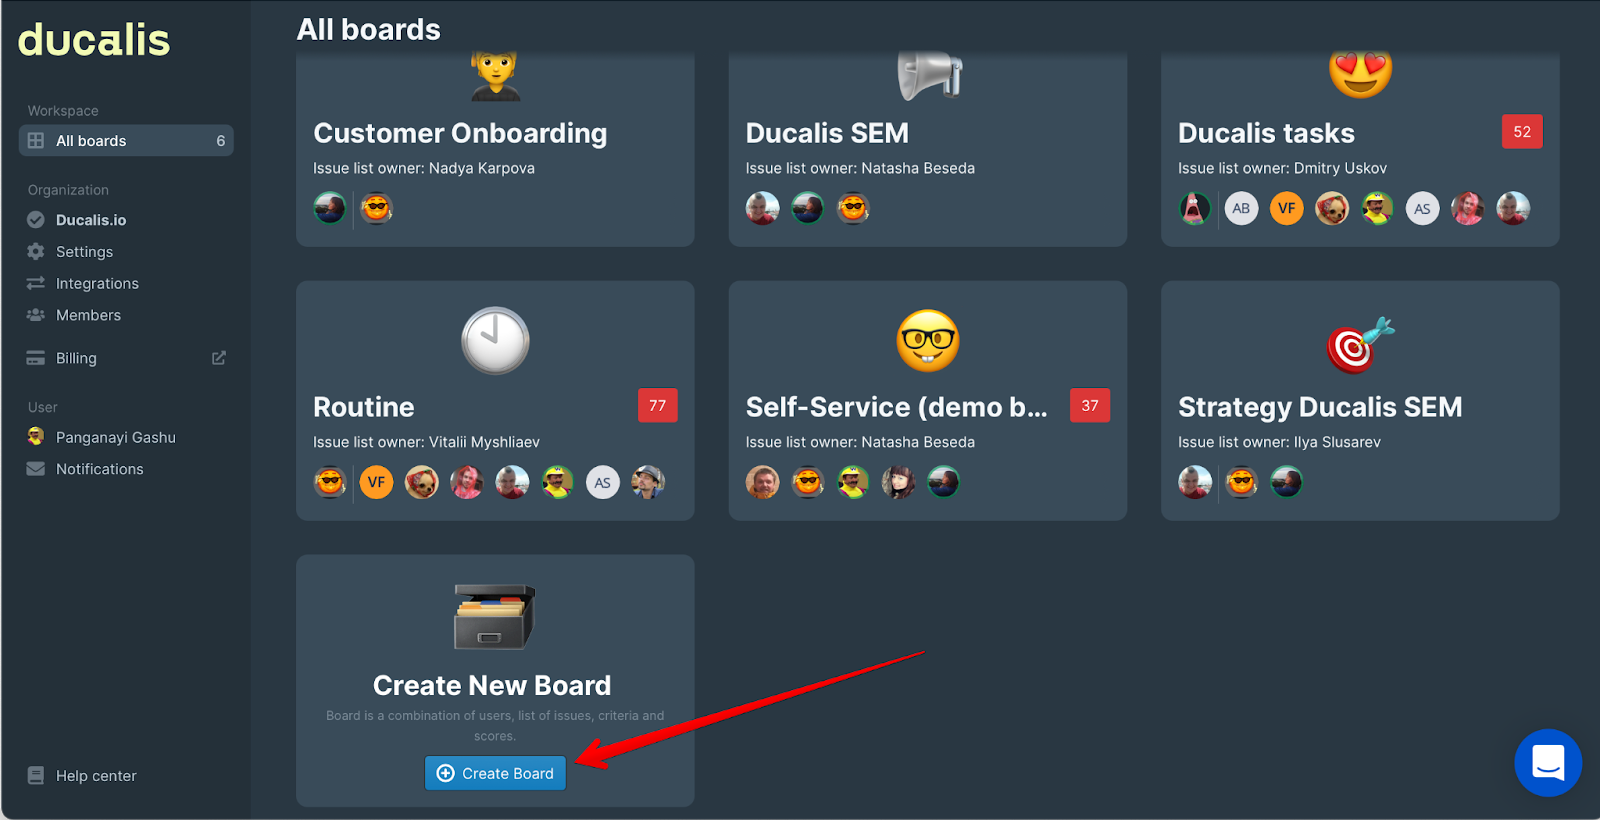
-
Anketi doldurun ve mevcut şablonlardan bir önceliklendirme çerçevesi seçin.
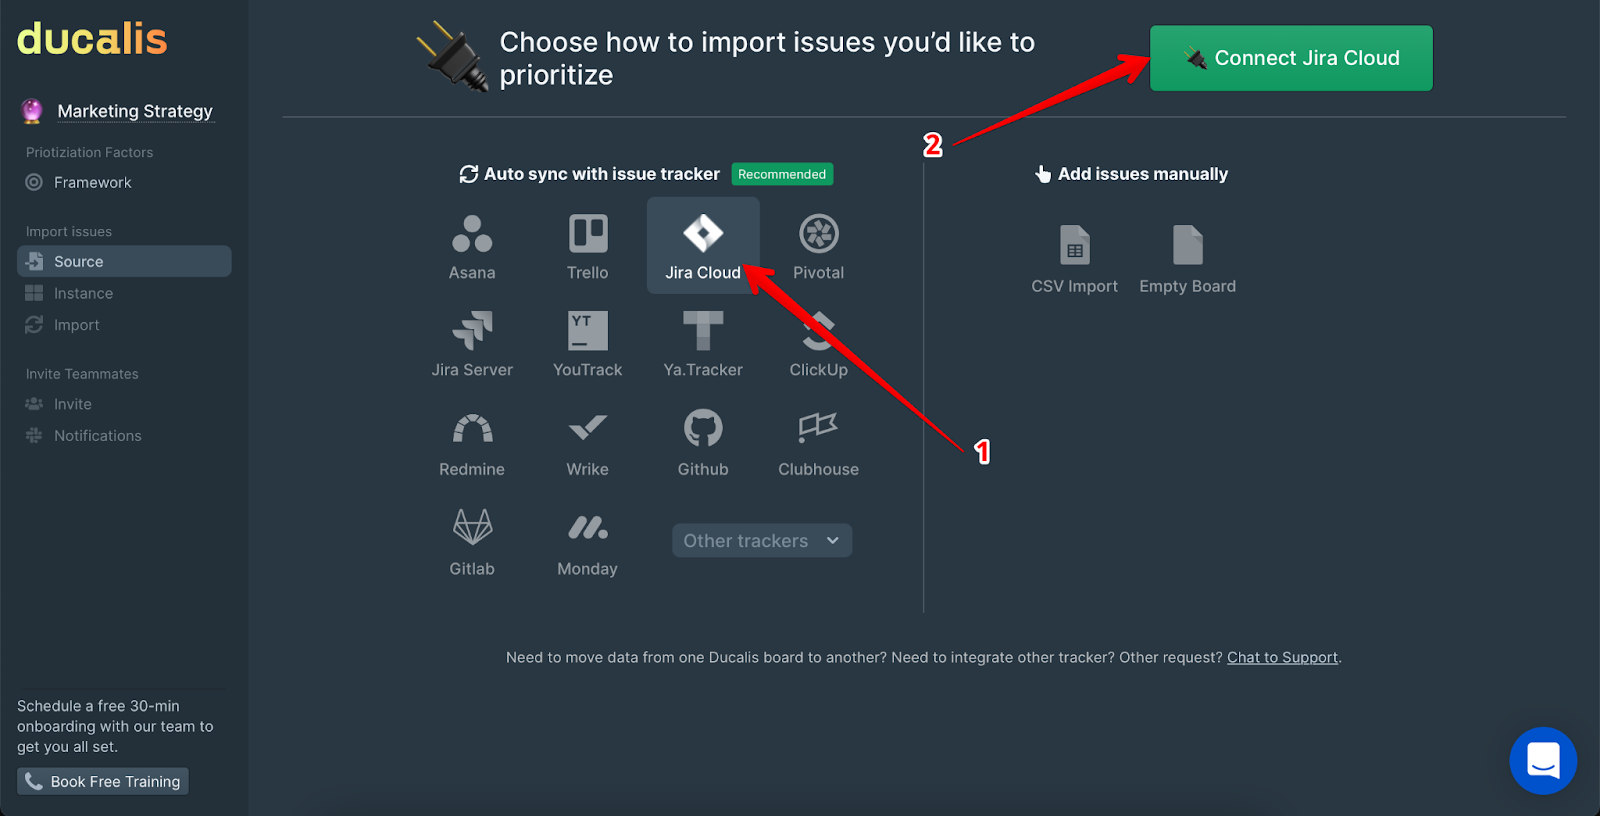
-
İzleyici olarak Jira Cloud'u seçin ve Connect Jira Cloud (Jira Cloud'a Bağlan) düğmesine tıklayın.

Adım 2: Jira Cloud'dan konuları içe aktarın
Ducalis'de bir Pano, değerlendirme parametreleriyle birlikte bir konu koleksiyonudur. Formül, ekipler ve kriterler gibi ayarlar her Pano için ayrı ayrı yapılandırılır. Önceliklendirmek istediğiniz konuları iki yöntemden birini kullanarak filtreleyin:
Yöntem A: Ducalis'de filtre oluşturun
-
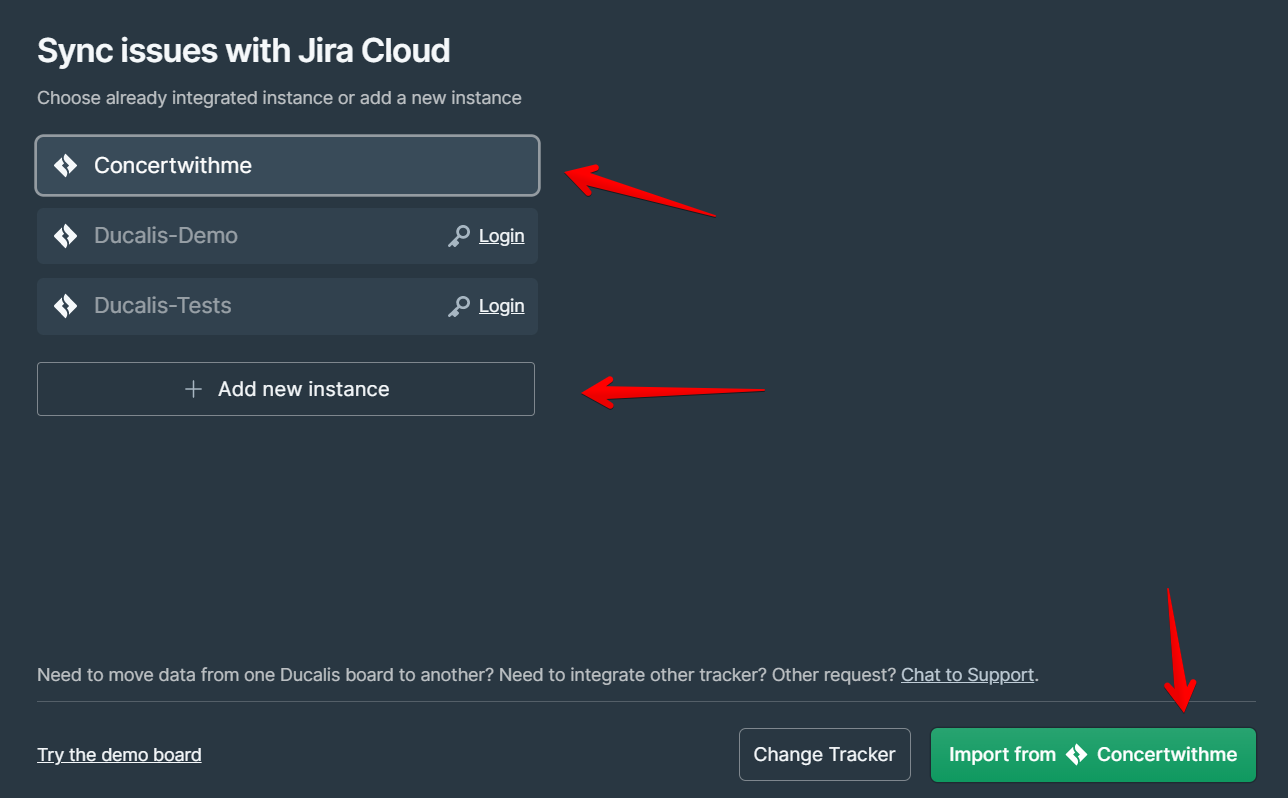
Gerekli konuların bulunduğu bir örnek seçin.
-
Current Integrations (Mevcut Entegrasyonlar) arasından seçin veya Add a new instance (Yeni örnek ekle) seçeneğini kullanın.
-
Import from the instance (Örnekten içe aktar) düğmesine tıklayın.
-
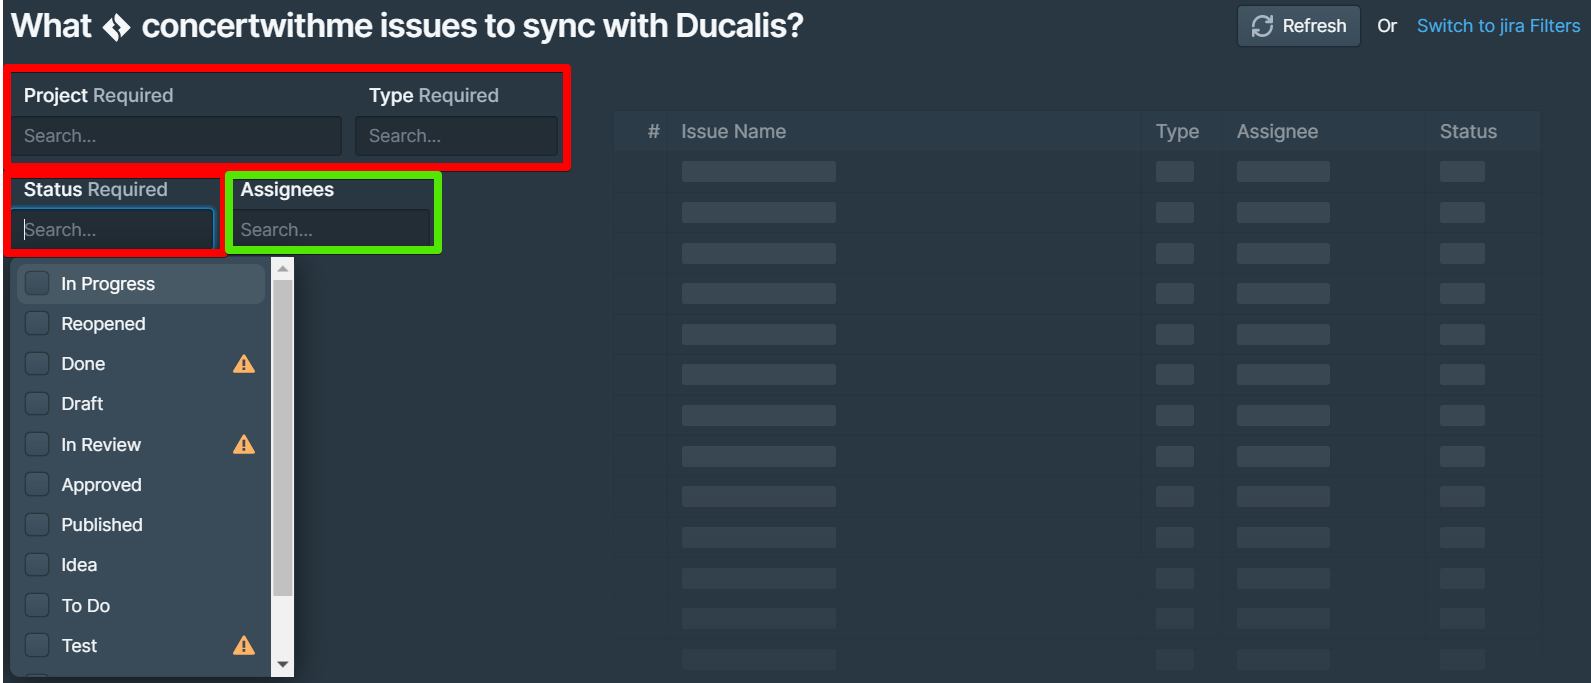
Ducalis ile senkronize etmek istediğiniz konuları filtreleyin:
- Project (Proje), Issue Type (Konu Türü) ve Status (Durum) zorunlu filtrelerdir
- Assignees (Atananlar) filtresi isteğe bağlıdır
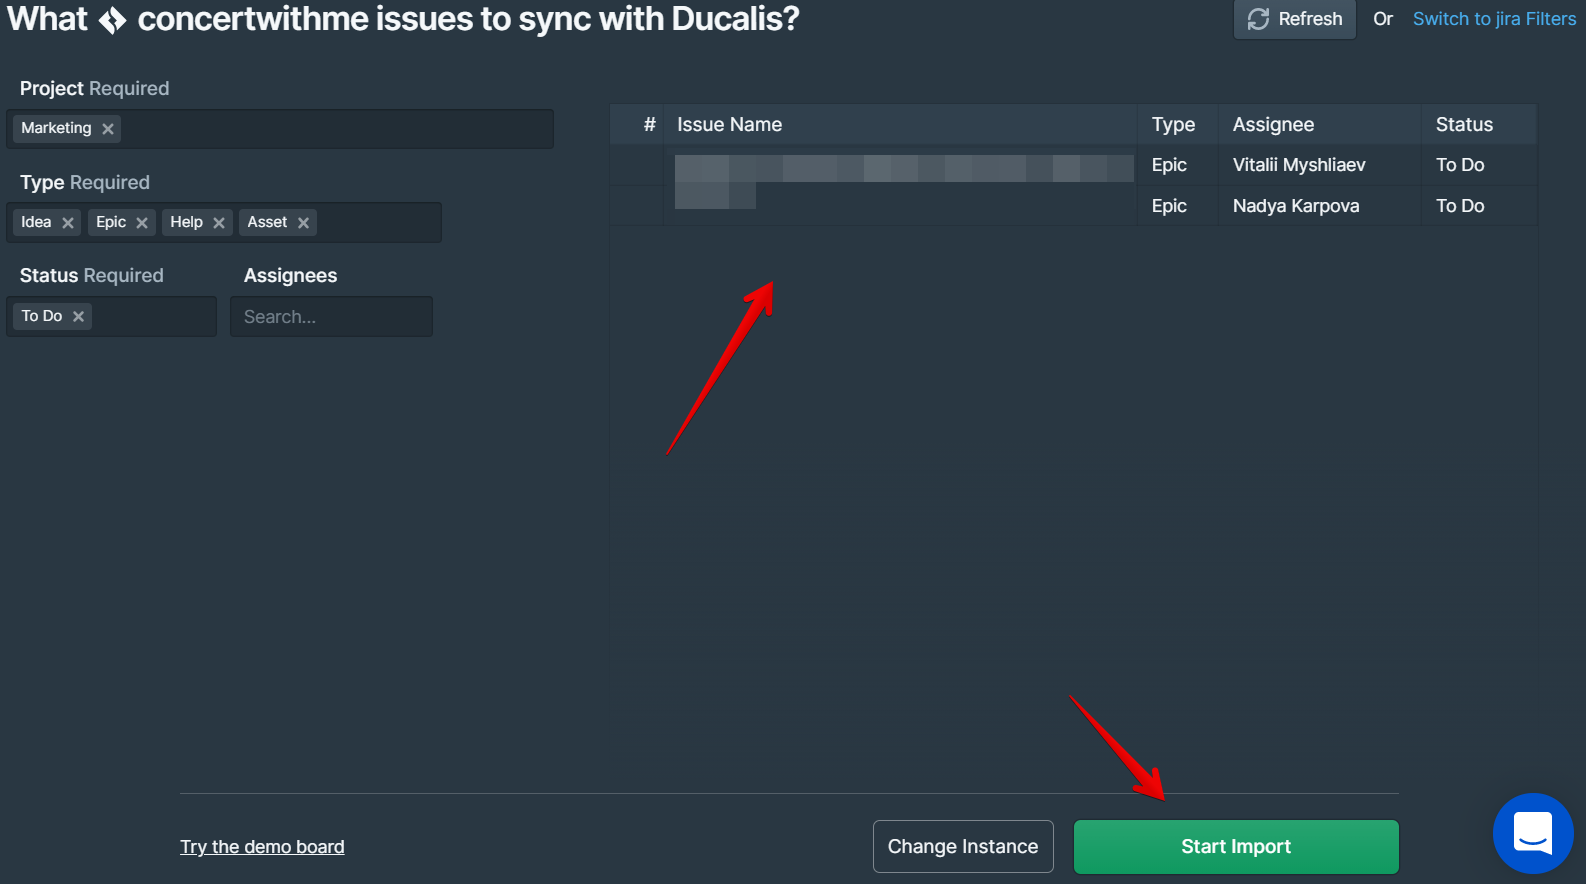
-
Filtreleri uyguladıktan sonra konularınızı önizleyin ve Start Import (İçe Aktarmayı Başlat) düğmesine tıklayın.
-
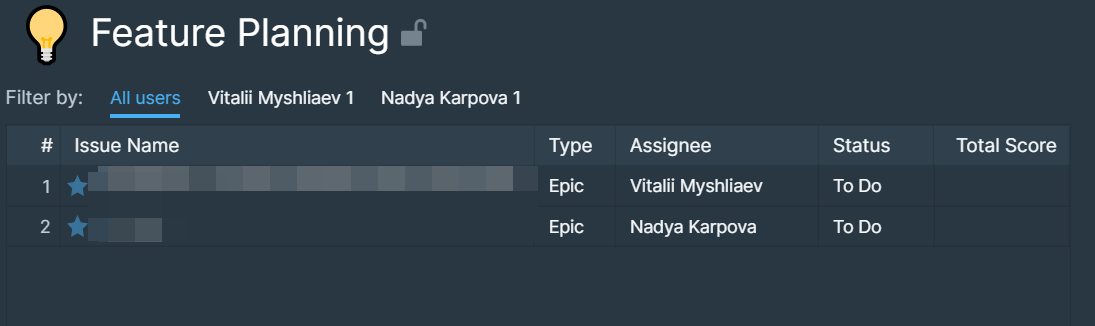
İçe aktarma tamamlandığında konularınız Panonuzda görünür olacaktır.
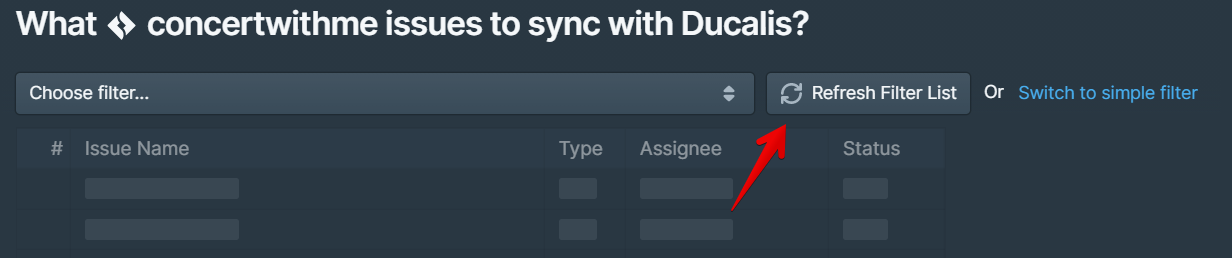
Yöntem B: Mevcut bir Jira filtresini bağlayın
-
İçe Aktarma sayfasından Switch to Jira Filters (Jira Filtrelerine Geç) düğmesine tıklayın.

-
Açılır menüden istediğiniz filtreyi seçin veya filtrenin adını yazarak arayın.
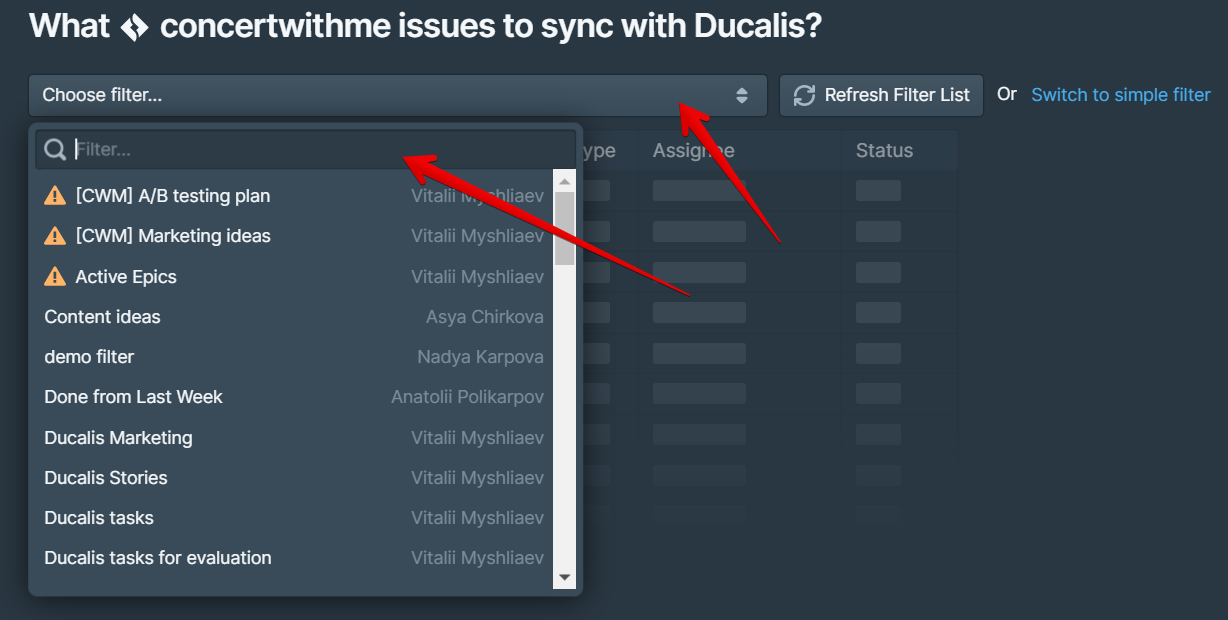
-
Filtreleri uyguladıktan sonra konularınızı önizleyin ve Start Import (İçe Aktarmayı Başlat) düğmesine tıklayın.

-
İçe aktarma tamamlandığında konularınız Panonuzda görünür olacaktır.
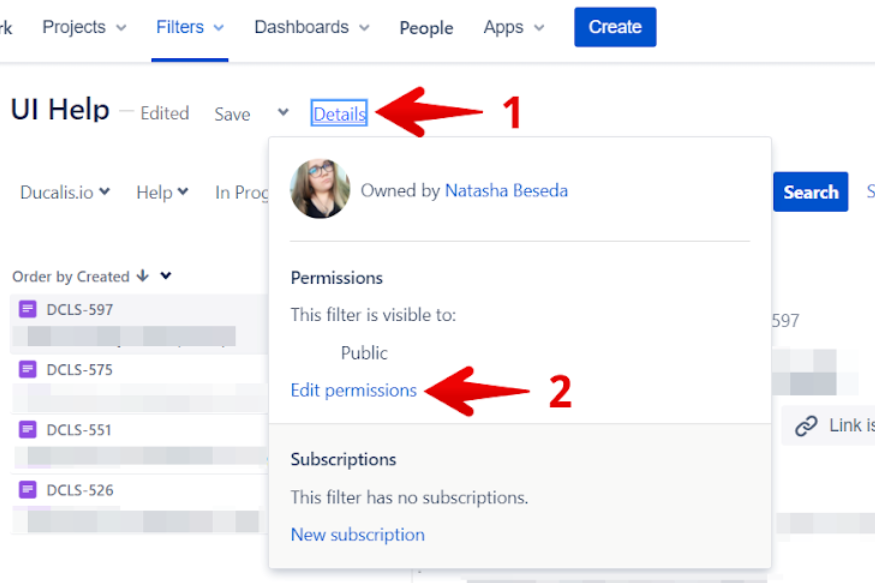
Sorun giderme: Filtre bulunamadı
Jira Cloud'da bir filtreniz varsa ancak görünmüyorsa, filtrenin erişim durumunu kontrol edin. Filtre erişim durumu Public, Open veya My Organization olmalıdır.
Jira Cloud'da filtre erişim durumunu kontrol etmek veya değiştirmek için:
-
Düzenlemek istediğiniz filtrede Details (Detaylar) düğmesine tıklayın.
-
Edit Permissions (İzinleri Düzenle) düğmesine tıklayın.
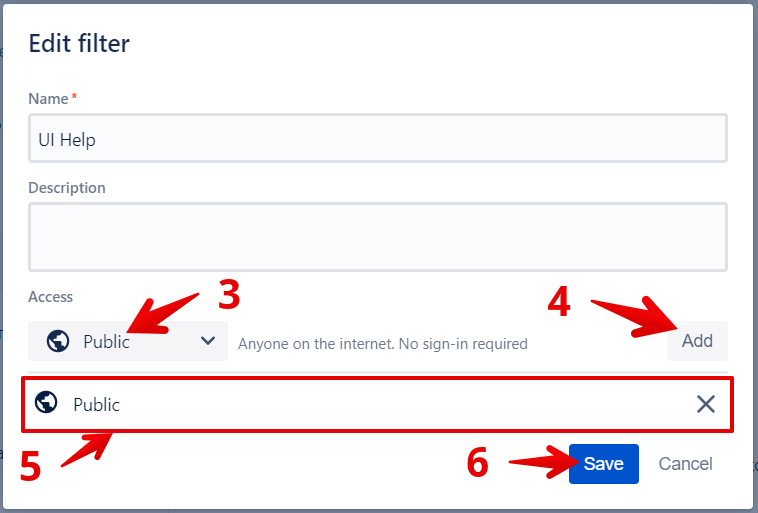
-
Erişim seviyesini Public, Open veya My Organization olarak ayarlayın.
-
Add (Ekle) düğmesine tıklayın.
-
Erişim durumunun eklendiğini doğrulayın.
-
Save (Kaydet) düğmesine tıklayın.
-
Ducalis'e dönün ve filtre listesini yenileyin.
Adım 3: Jira Cloud'da özel alanlar oluşturun
Bir Ducalis Panosu, bir veya daha fazla şirket tarafından yönetilen proje veya bir ekip tarafından yönetilen proje ile kullanılabilir.
Şirket tarafından yönetilen projeler için:
-
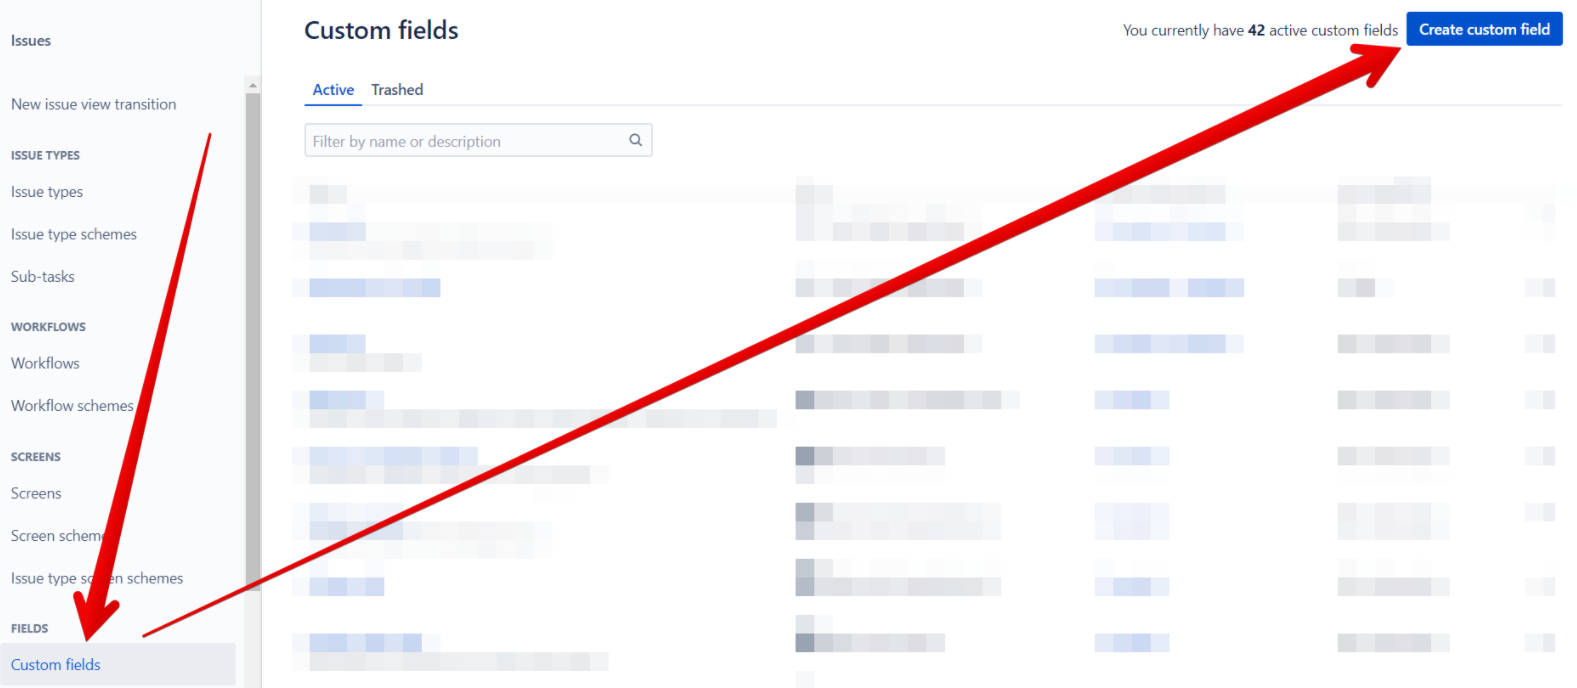
Settings (Ayarlar) düğmesine tıklayın ve Issues (Konular) seçeneğini seçin.
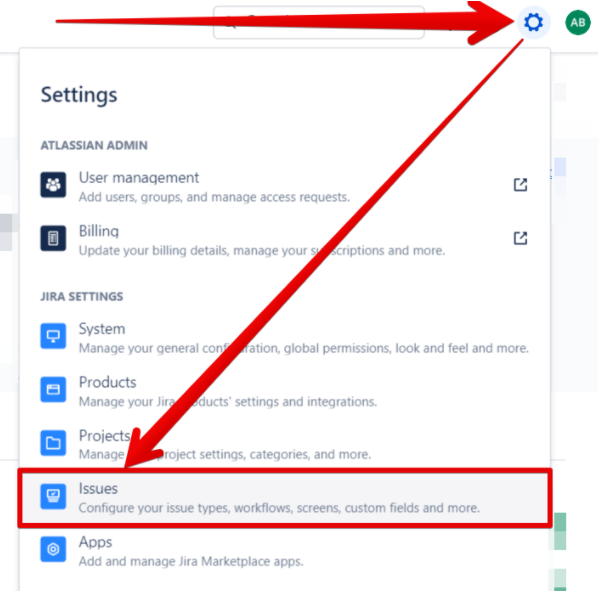
-
Sol menüden Custom Fields (Özel Alanlar) seçeneğini seçin.
-
Sağ üst köşedeki Create custom field (Özel alan oluştur) düğmesine tıklayın.
-
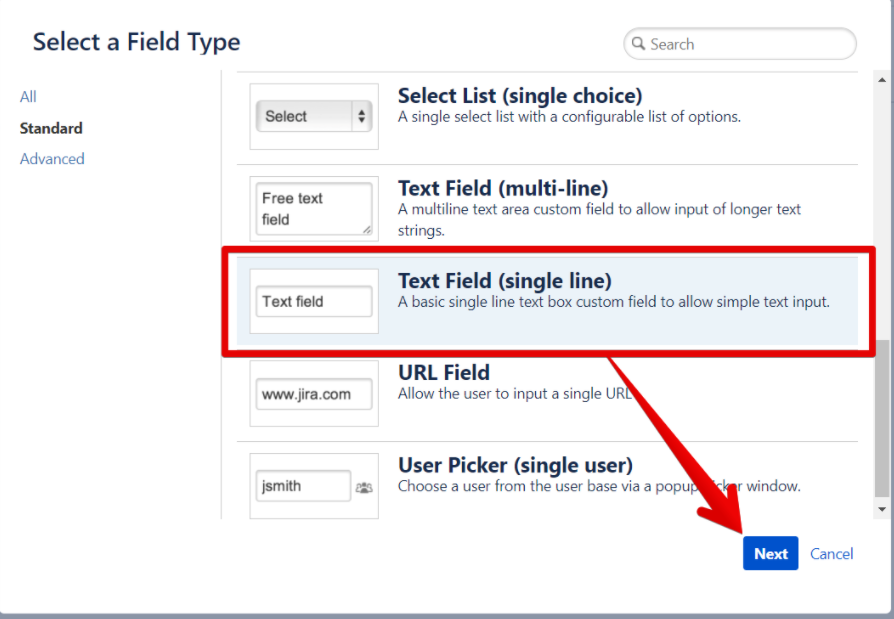
Text Field (single line) (Metin Alanı (tek satır)) seçeneğini seçin ve Next (İleri) düğmesine tıklayın.
-
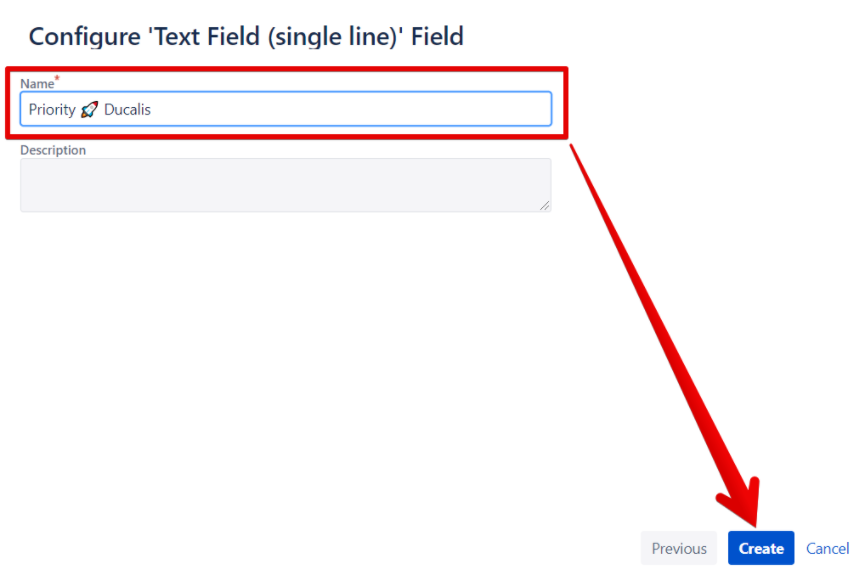
Alan adını Ducalis ayarlarından kopyalayın. Alan adlarınız pano emoji'nize bağlıdır.
-
Jira Cloud'da alan adını yapıştırın ve Create (Oluştur) düğmesine tıklayın.
-
Aşağıdaki ekranları bağladıktan sonra Update (Güncelle) düğmesine tıklayın:
- Default Screen
- Resolve Issue Screen
- Workflow Screen
- Ducalis pano filtresindeki projeler için proje anahtarlarına sahip tüm ekranlar
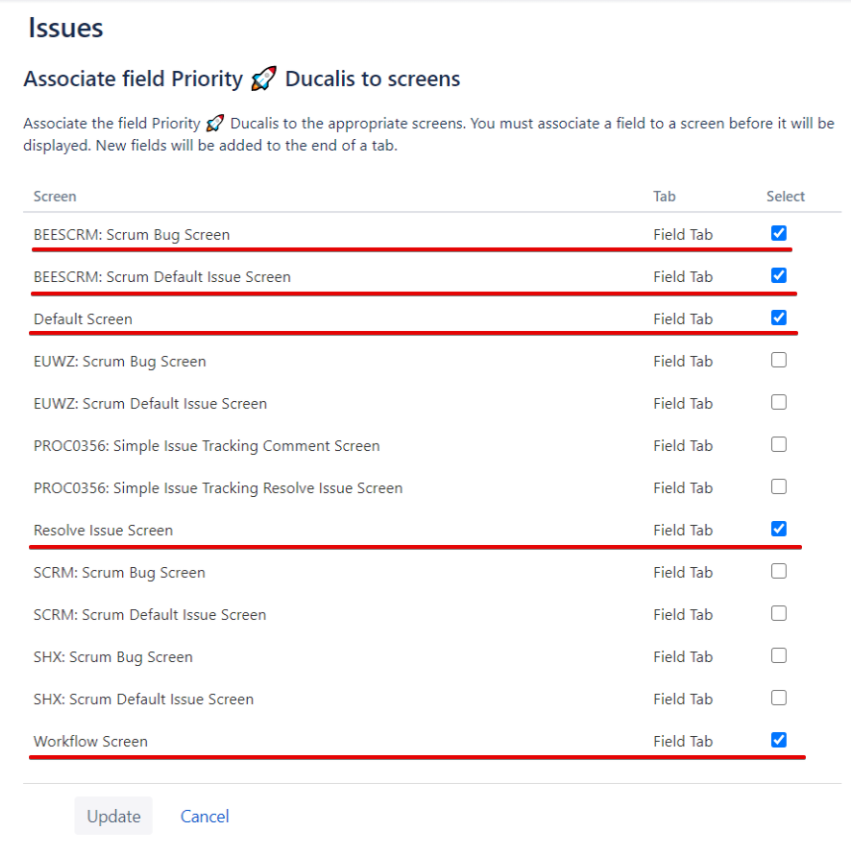
-
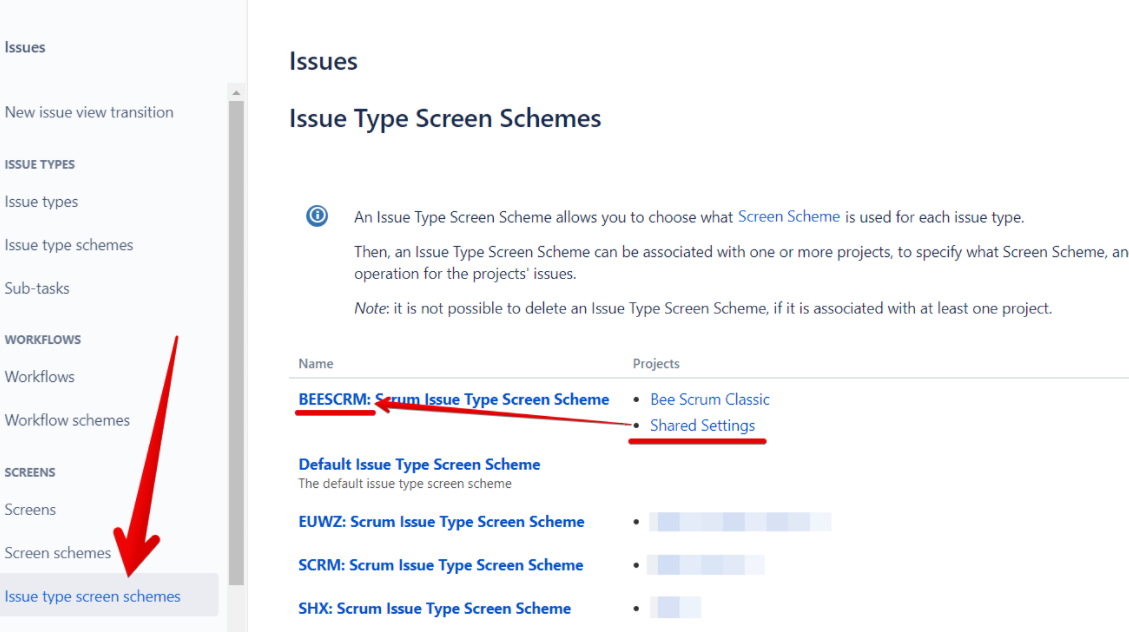
Proje anahtarınızı göremiyorsanız çünkü başka bir projeyle ayarları paylaşıyorsa, hangi proje anahtarının sizinkiyle ilişkili olduğunu görmek için Issue (Konu) seçeneğini açın ve yeni bir sekmede "screen schemes" yazın.

-
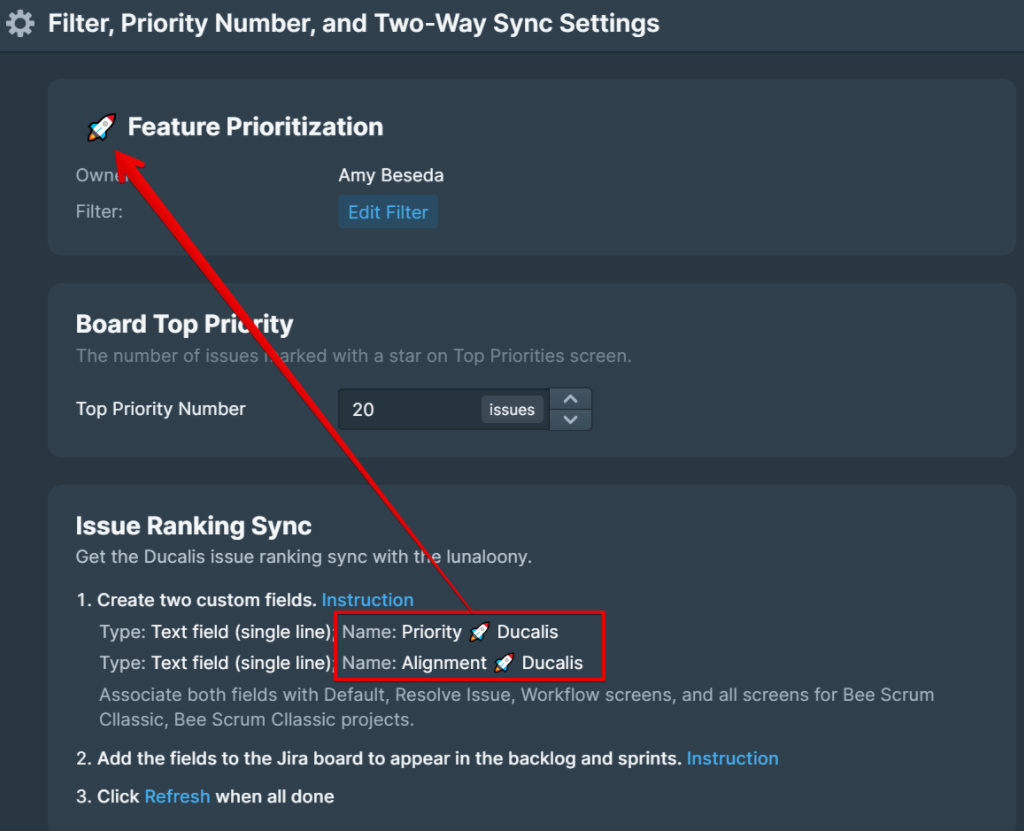
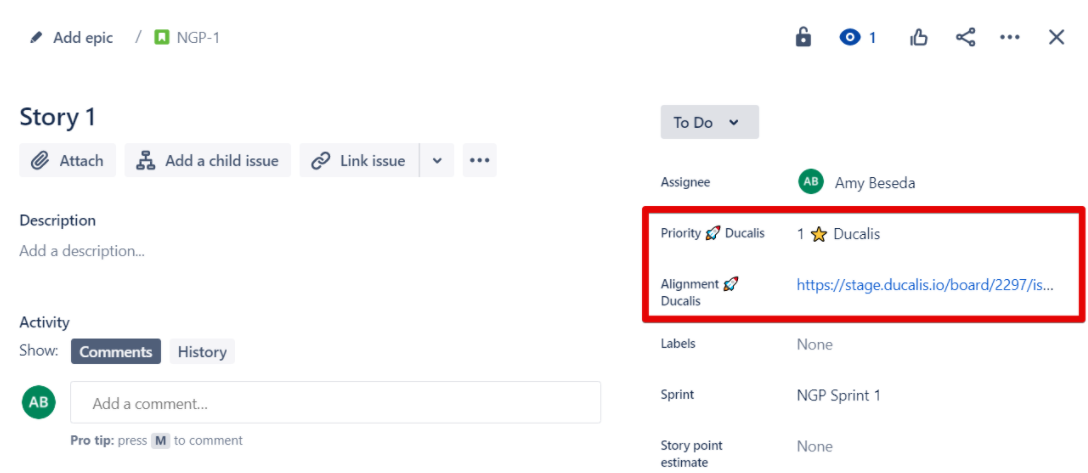
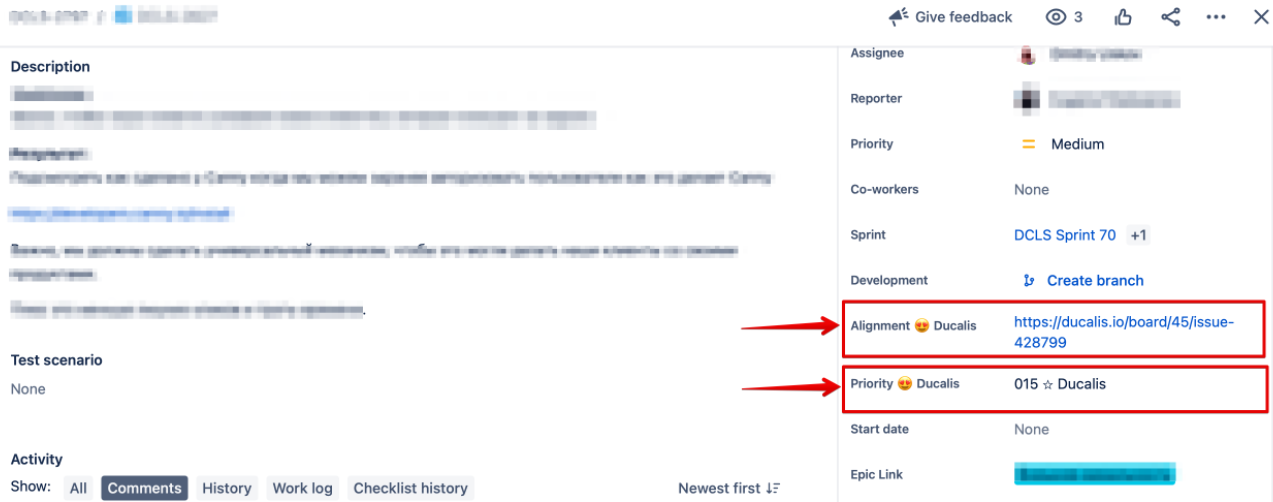
Konu sıralaması senkronizasyonu için iki alan oluşturun: Priority (Öncelik) ve Alignment (Hizalanma). Konuların içinde, sıralama ve hizalanma analizine bağlantılar bulacaksınız.

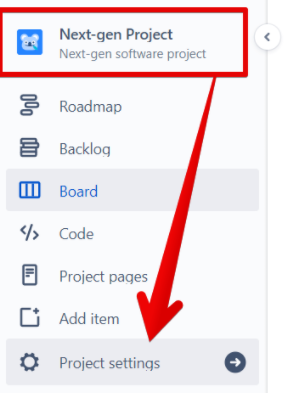
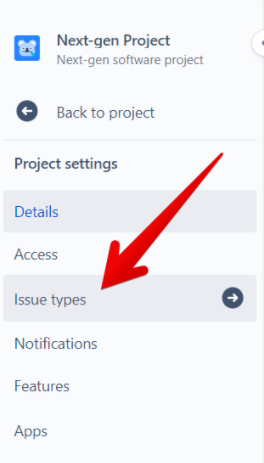
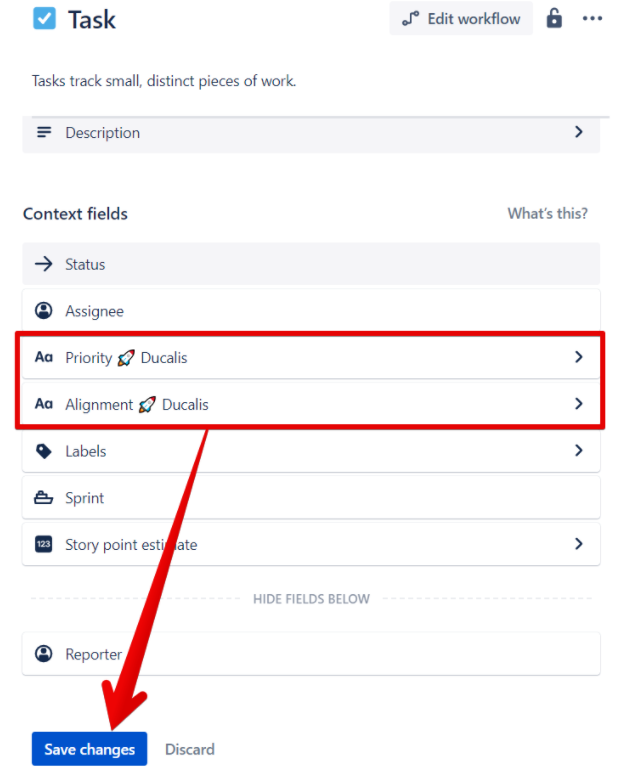
Ekip tarafından yönetilen projeler için:
-
Project settings (Proje ayarları) düğmesine tıklayın.
-
Issue Types (Konu Türleri) düğmesine tıklayın.
-
Önceliklendirmek istediğiniz bir konu türü seçin.
-
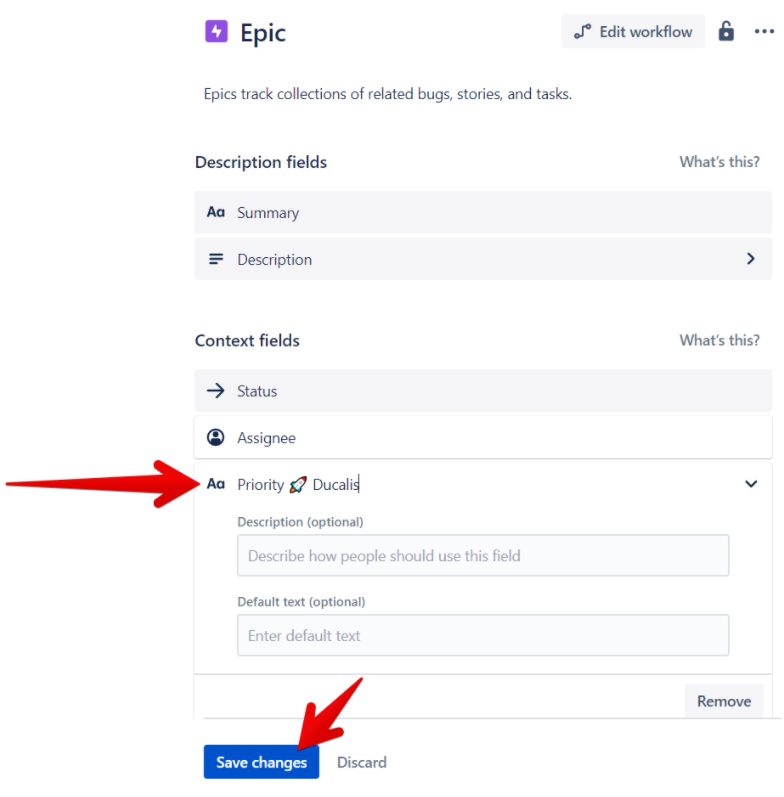
Sağdaki Create A Field (Alan Oluştur) bölümünden Short Text (Kısa Metin) alanını sürükleyin ve Context fields (Bağlam alanları) arasına bırakın.
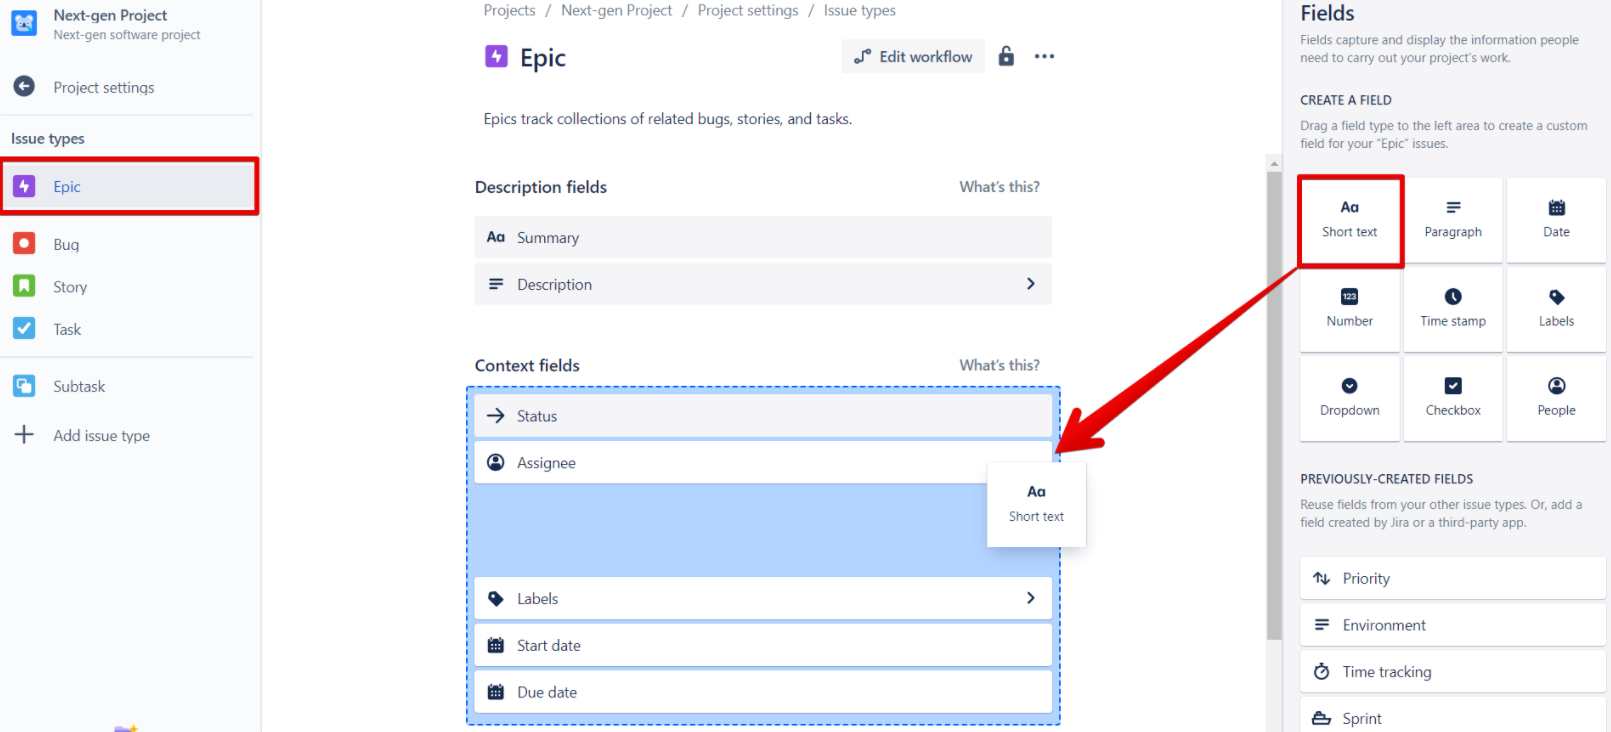
-
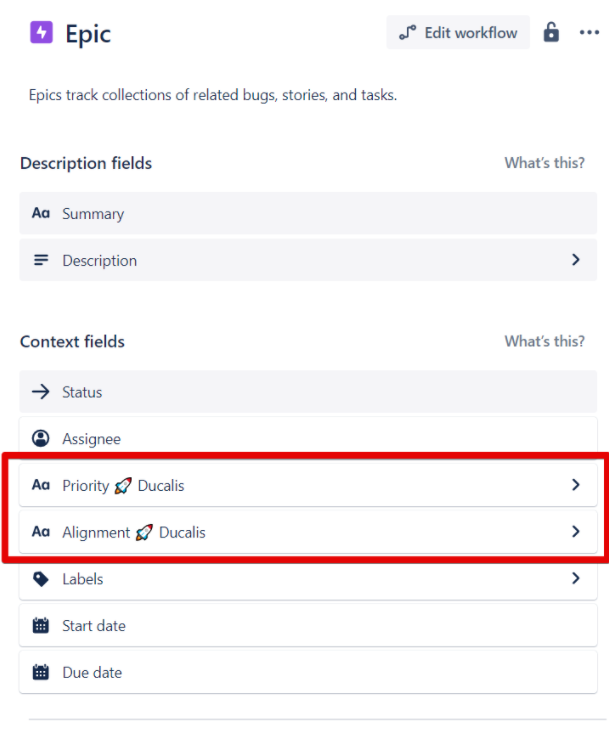
Alan adını Priority Ducalis olarak yazın ve Save Changes (Değişiklikleri Kaydet) düğmesine tıklayın.
-
Aynı şekilde başka bir alan oluşturun ve Alignment Ducalis olarak adlandırın.
-
Önceliklendirdiğiniz diğer tüm konu türleri için, Previously Created Fields (Önceden Oluşturulan Alanlar) bölümünden her iki alanı da Context fields (Bağlam alanları) içine sürükleyip bırakın.
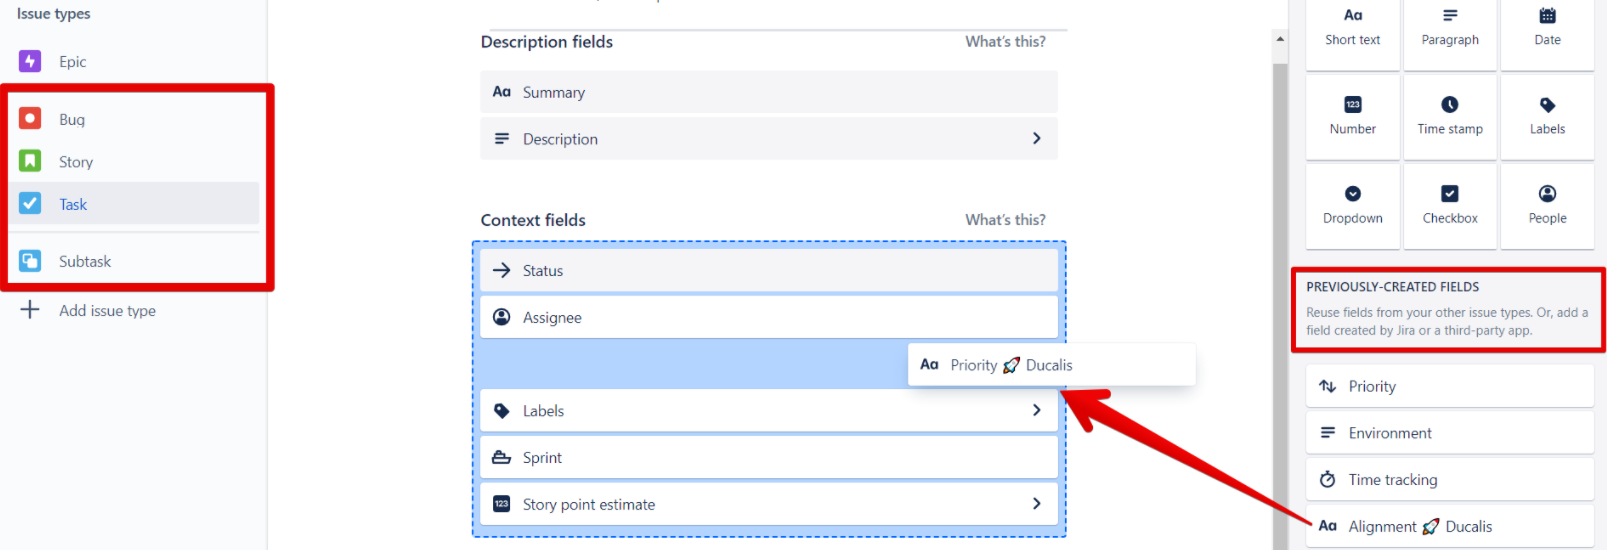
-
Her konu türü için değişiklikleri kaydedin.
-
Konuların içinde, sıralama ve hizalanma analizine bağlantılar bulacaksınız.
Adım 4: Sıralamaları görüntülemek için Jira panosunu yapılandırın
Jira Cloud panonuzu, iş listesinde ve aktif sprint'te Ducalis sıralamasını görmek ve konu sırasını önceliğe göre ayarlamak için yapılandırın.
Konu sırasını yapılandırın:
-
Pano ayarlarına erişmek için üç nokta düğmesine tıklayın.
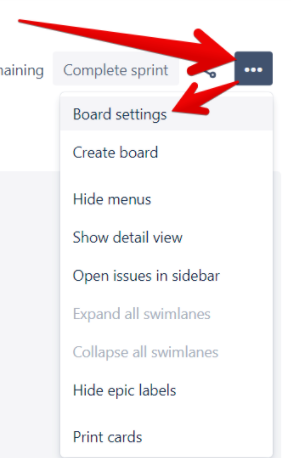
-
General (Genel) menüsünden Edit Filter Query (Filtre Sorgusunu Düzenle) seçeneğini seçin.
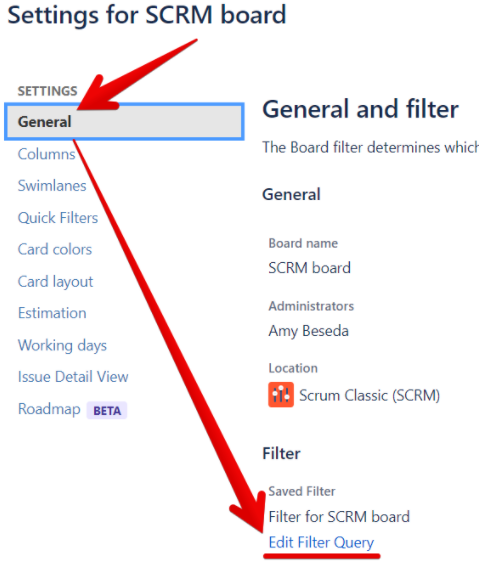
-
Sorguda ORDER BY priority yazın ve menüden Priority (your emoji) Ducalis özel alanını seçin.
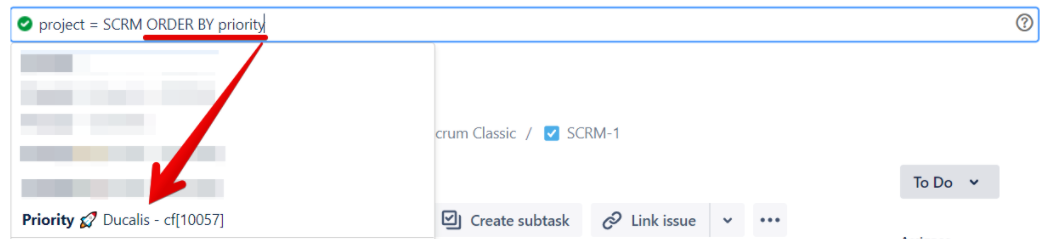
-
Bir boşluk ekleyin, artan sıralama için ASC yazın, Search (Ara) ve ardından Save (Kaydet) düğmesine tıklayın.

-
Tüm konularınız artık önceliklendirilecektir.
İş listesi ve aktif sprint görünümünü yapılandırın:
-
Pano ayarlarına erişmek için üç nokta düğmesine tıklayın.
-
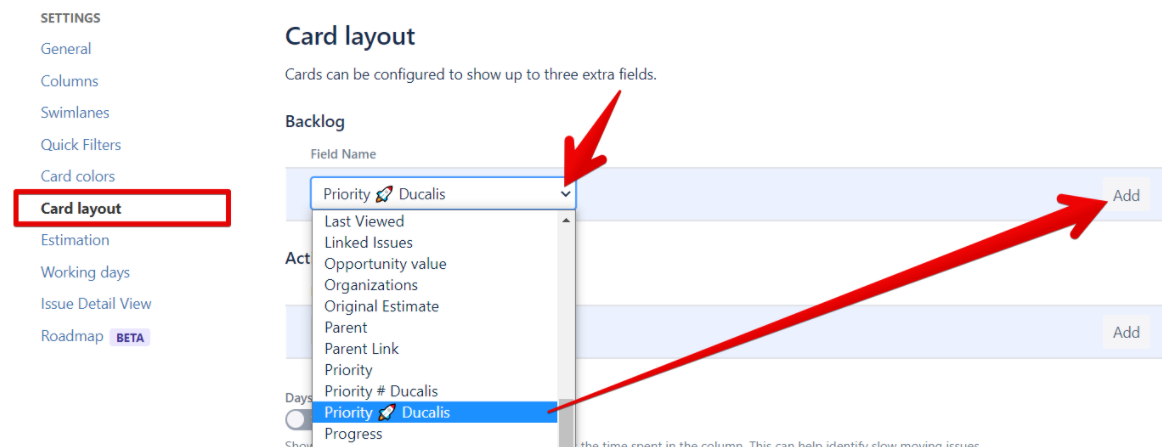
Card Layout (Kart Düzeni) menüsünden Backlog (İş Listesi) bölümüne gidin.
-
Field Name (Alan Adı) açılır menüsünden Priority Ducalis seçeneğini seçin ve Add (Ekle) düğmesine tıklayın.
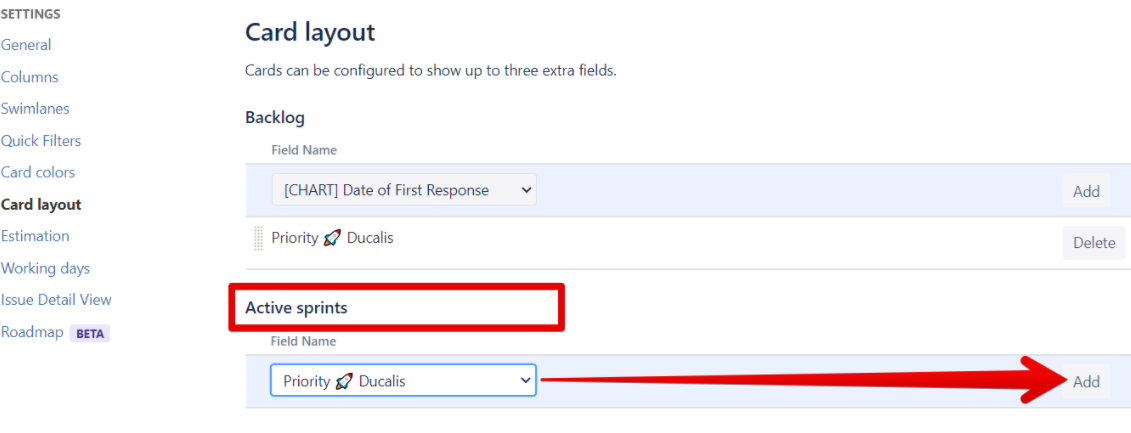
-
Active Sprints (Aktif Sprint'ler) bölümüne gidin, Field Name (Alan Adı) açılır menüsünden Priority Ducalis seçeneğini seçin ve Add (Ekle) düğmesine tıklayın.
-
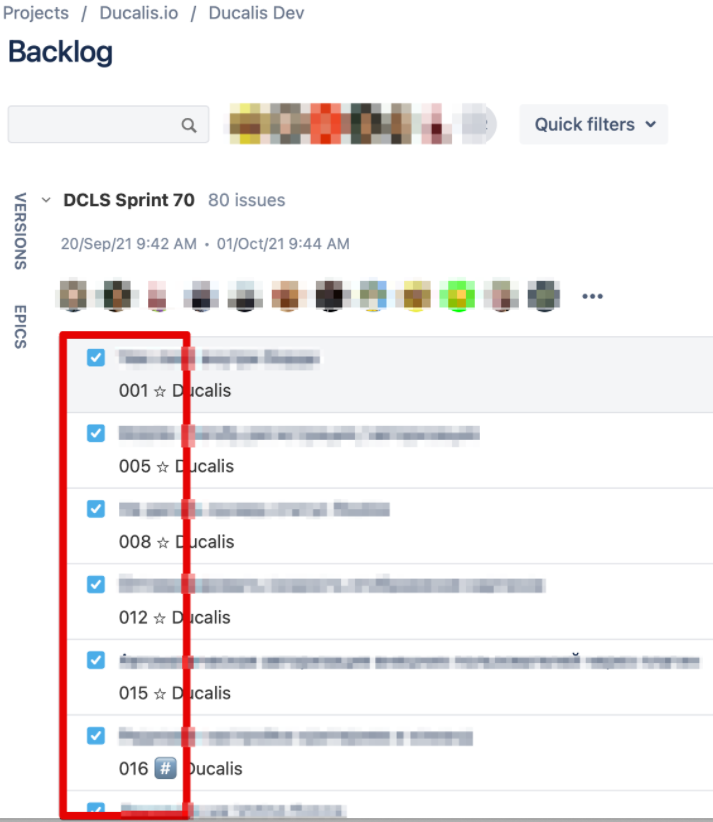
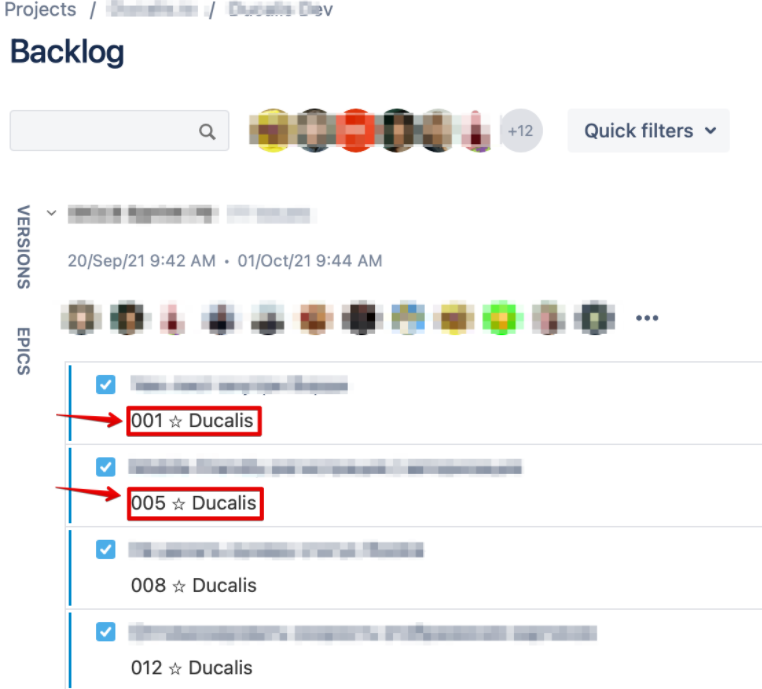
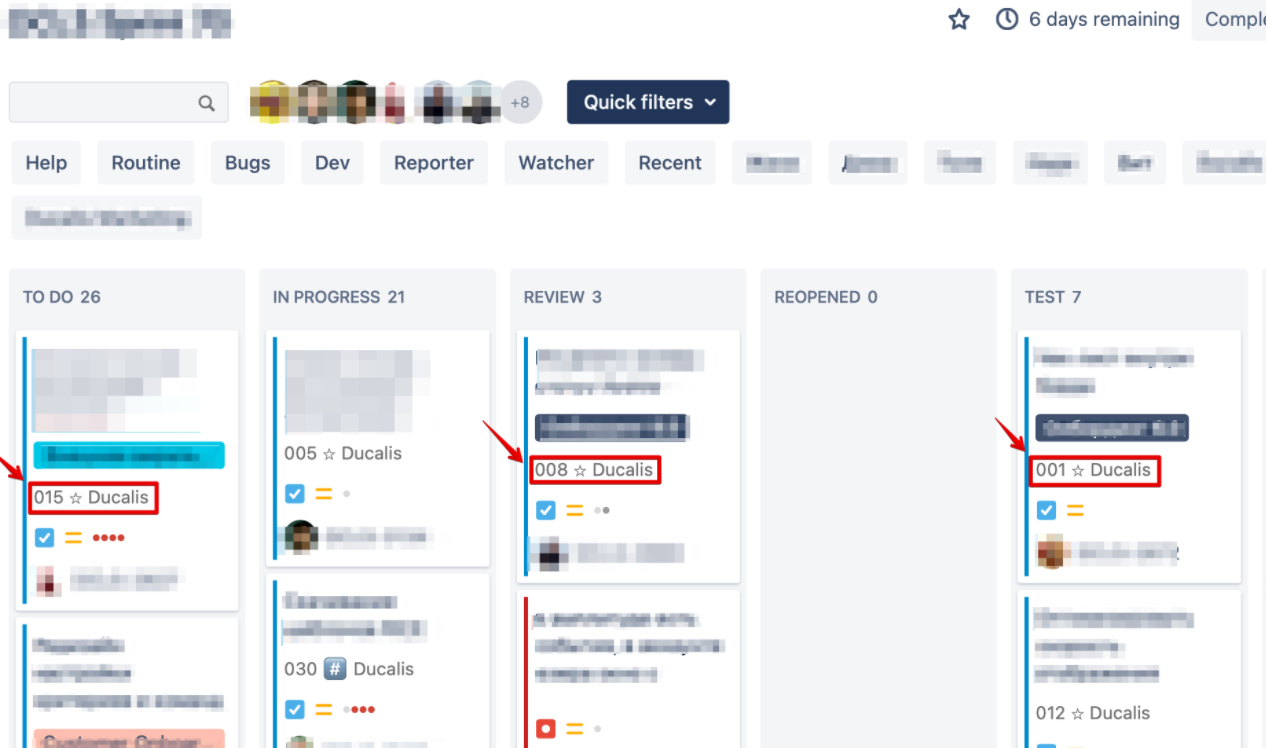
Konu sıralaması artık konu kartında, iş listesinde ve aktif sprint'te görünür:
- İş Listesi:
- Aktif Sprint:
- Konu Kartı:
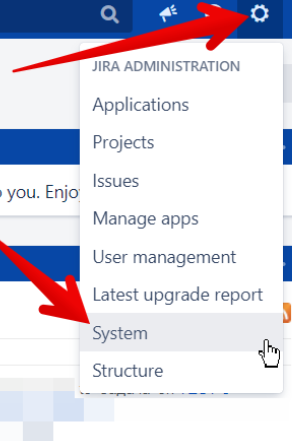
Adım 5: Gerçek zamanlı senkronizasyon için webhook oluşturun
-
Jira Cloud hesabınızı açın ve dişli simgesinden System (Sistem) seçeneğini seçin. (Yönetici erişimi gereklidir)
-
Advanced (Gelişmiş) sekmesinin altında Webhooks seçeneğini seçin.
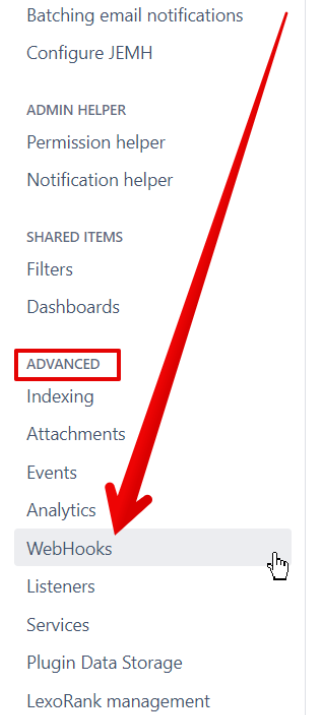
-
Create a Webhook (Webhook Oluştur) düğmesine tıklayın.

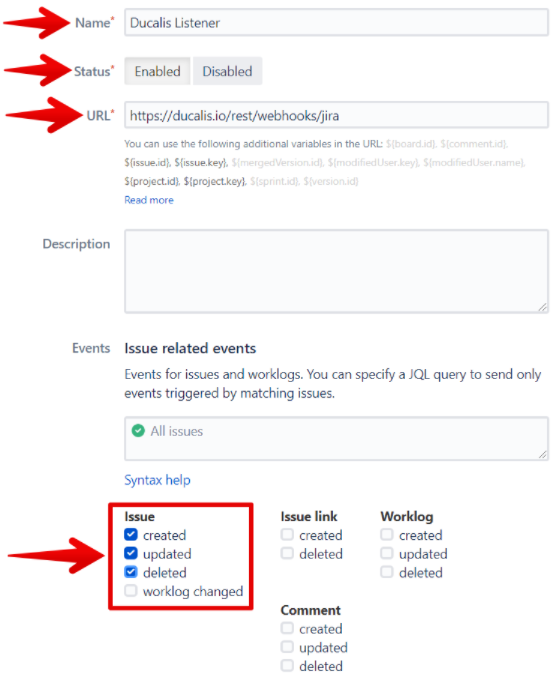
-
Aşağıdaki bilgileri girin:
- Name (Ad): Herhangi bir ad (örneğin, Ducalis)
- Status (Durum): Enabled (Etkin)
- URL: https://hi.ducalis.io/rest/webhooks/jira
- Issue (Konu): Created, Updated ve Deleted seçeneklerini işaretleyin
-
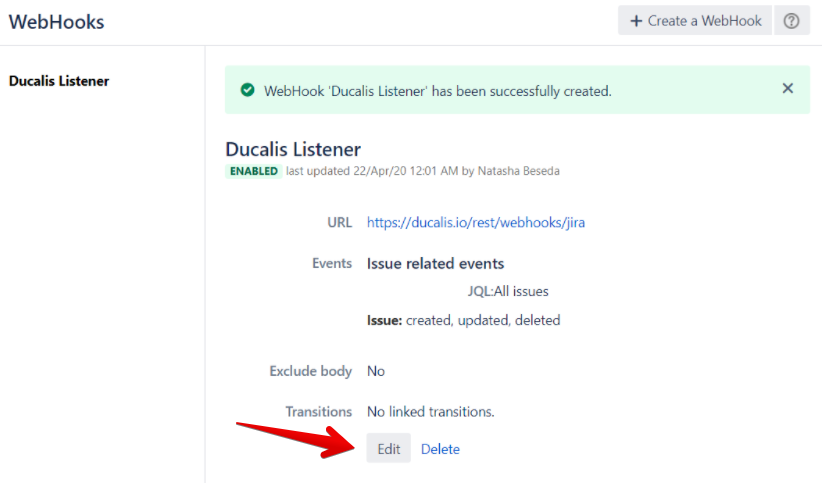
Create (Oluştur) düğmesine tıklayın.
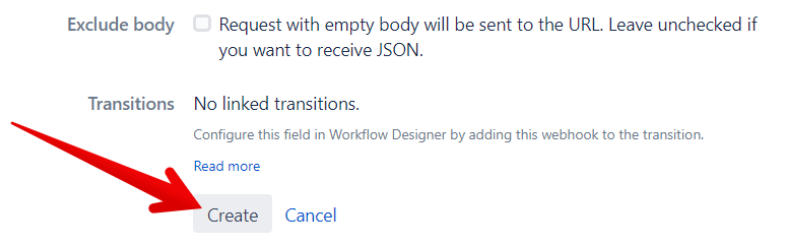
-
Webhook artık aktif. Gerekirse istediğiniz zaman düzenleyebilirsiniz.
Avantajlar ve dezavantajlar
Avantajlar:
- İlk kurulumdan sonra otomatik süreç
- Gerçek zamanlı 2 yönlü senkronizasyon
- Hızlı kullanıcı arayüzü
- Yüksek güvenilirlik ve veri duplikasyonu yok
- Kolay veri desteği
Dezavantajlar:
- Karmaşık ilk kurulum ve yapılandırma
- Yeni araç ve iş akışı için öğrenme eğrisi
Özel özellikler:
- Her ekip için farklı önceliklendirme sistemleri
- Seçim yapabileceğiniz çok sayıda önceliklendirme çerçevesi
- Özelleştirilmiş kriterlerle özel çerçeveler
- Yüksek düzeyde özelleştirilebilir kriterler ve formüller
- İşbirlikçi değerlendirme ve önceliklendirme
- Belirsiz görevler hakkında sorular sorun
2. Google Sheets alternatifleri
Ek işlevsellik sunan Google Sheets'e alternatif araçlar.
Airtable
Airtable, veritabanı yeteneklerini elektronik tablo işlevselliğiyle birleştiren bir elektronik tablo-veritabanı hibrididir. Veritabanları oluşturabilir, sütun türlerini yapılandırabilir, girdiler ekleyebilir, tabloları birbirine bağlayabilir, işbirliği yapabilir, kayıtları sıralayabilir ve görünümleri yayınlayabilirsiniz.
Jira sürümünüzü belirleyin
Jira'ya erişmek için kullandığınız URL'yi kontrol edin:
- URL'niz .jira.com veya .atlassian.net ise, Jira Cloud kullanıyorsunuz
- URL'niz jira.mycompanyname.com ise, Jira Server kullanıyorsunuz
Jira Server entegrasyonu
Gereksinimler:
- Temel JavaScript bilgisi
- Jira Server erişimi
- Airtable API Key
- Jira Server entegrasyon GitHub Repository
- Node.js v8 veya üzeri
Prosedür:
Şunları yapan bir node.js uygulaması oluşturun:
- Airtable ve Jira Server'a giriş yaptıktan sonra bir Jira Server Panosu'ndan tüm konuları almak için bir GET isteği gönderir
- Yeni kayıtları Airtable veritabanınıza ekler
Süreç:
-
Senkronize etmek istediğiniz base, tablo ve alanları seçin: Tablonuzun benzersiz bir tanımlayıcısı olmalıdır. Veri çekmeden önce base şemanızı tamamlayın. Her Jira öğesi, referans için base'inizde kaydedilen benzersiz bir kimliğe sahip olacaktır.
-
Kimlik bilgilerinizi doğrulayın:
- Airtable: API Key Oluşturun
- Jira Server: Bir kimlik doğrulama yöntemi seçin:
-
Jira Server'ı yerel makinenize kurun:
-
Jira Server'ı Airtable'a bağlayın:
- GitHub Repository'yi fork edin.
- Terminal veya Komut İstemi'ni kullanarak repository konumuna gidin.
- Gerekli NPM modüllerini yüklemek için
npm -ikomutunu çalıştırın. - Aşağıdaki ortam değişkenlerini ayarlayın:
- AIRTABLE_BASE_ID
- AIRTABLE_APIKEY
- JIRA_COOKIE
- JIRA_AUTH
- JIRA_ENDPOINT
- Base'inizi özelleştiriyorsanız
index.jsdosyasındaki tablo ve alan adlarını güncelleyin. - Tüm konuları almak ve Airtable veritabanınızda yeni kayıtlar oluşturmak için terminalde
node index.jskomutunu çalıştırın.
Jira Cloud entegrasyonu
Gereksinimler:
-
Jira Cloud örneğiniz için bir API token oluşturun ve güvenli bir şekilde saklayın.
-
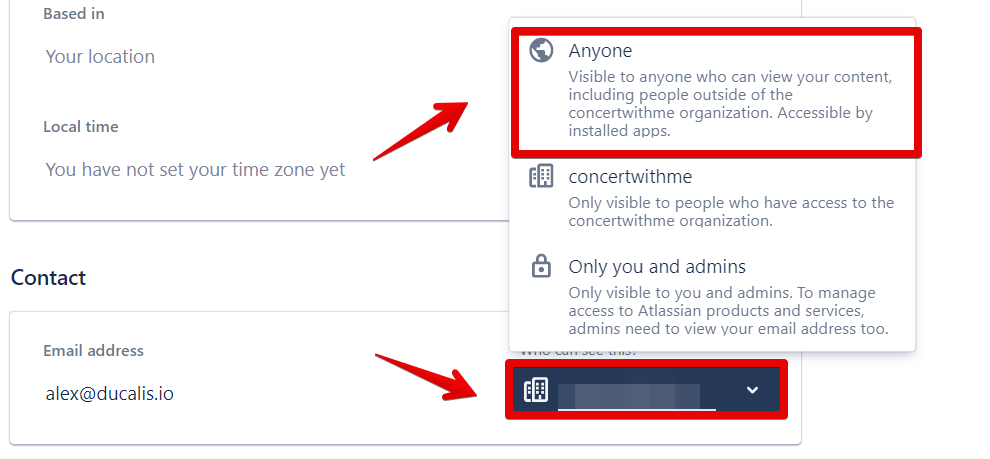
Atanan alanlarını etkinleştirin: Jira API gizlilik kısıtlamaları nedeniyle, atanan bilgilerini içe aktarmak için kullanıcı e-posta görünürlüğünü etkinleştirin.
Yönetici seçeneği: Jira Sistem ayarlarında kullanıcı e-posta görünürlüğünü Hidden'dan Public'e değiştirin. Public tek desteklenen seçenektir.
Bireysel seçenek: Kullanıcılar Profile and Visibility sayfasında e-posta görünürlüğünü manuel olarak güncellemelidir. Ayrıntılı talimatlar.
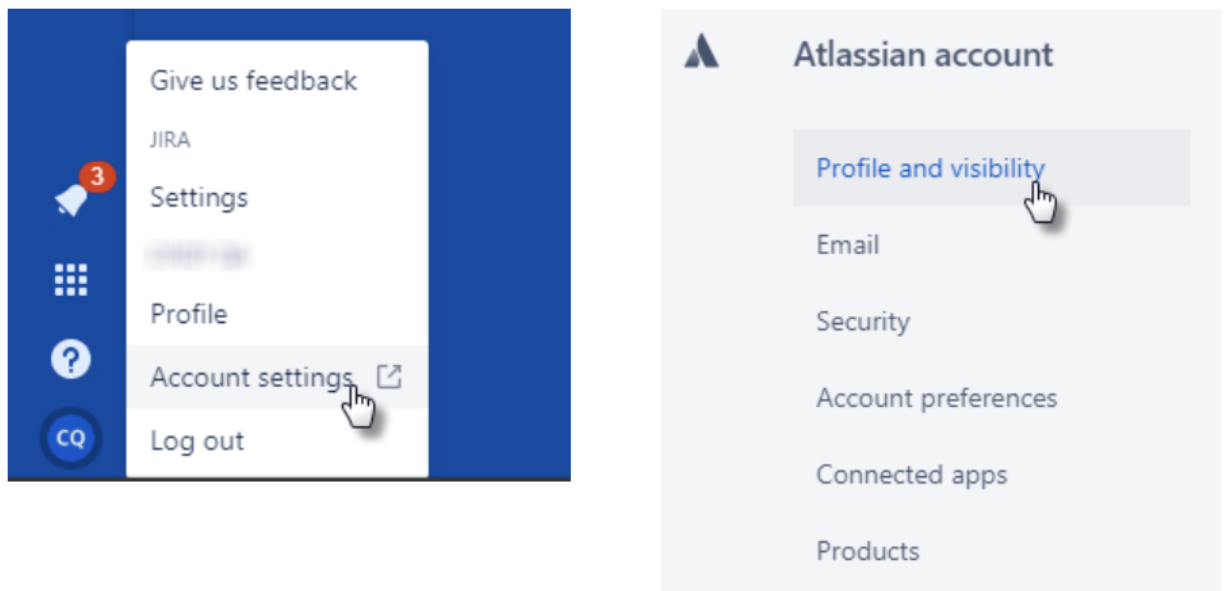
- Profile (Profil) simgesine tıklayın ve Account Settings (Hesap Ayarları) seçeneğini seçin
- Profile and Visibility sayfasının altındaki Contact (İletişim) alanına gidin
- "Only you and admins" seçeneğini "Anyone" olarak değiştirin
Kurulum prosedürü:
Jira Cloud uygulaması, uygulamayı ilk kez gösterge panelinize eklediğinizde bir Jira hesabına bağlanmanızı ister. Ekrandaki talimatları izleyin:
- E-postanızı girin: Oluşturduğunuz API token ile ilişkili e-posta adresini kullanın
- Jira çalışma alanı adınızı girin: Açılır menüden .atlassian.net veya .jira.com seçeneğini seçin
- API token'ınızı güvende tutun: Kaybolursa yeni bir anahtar oluşturun

Süreç:
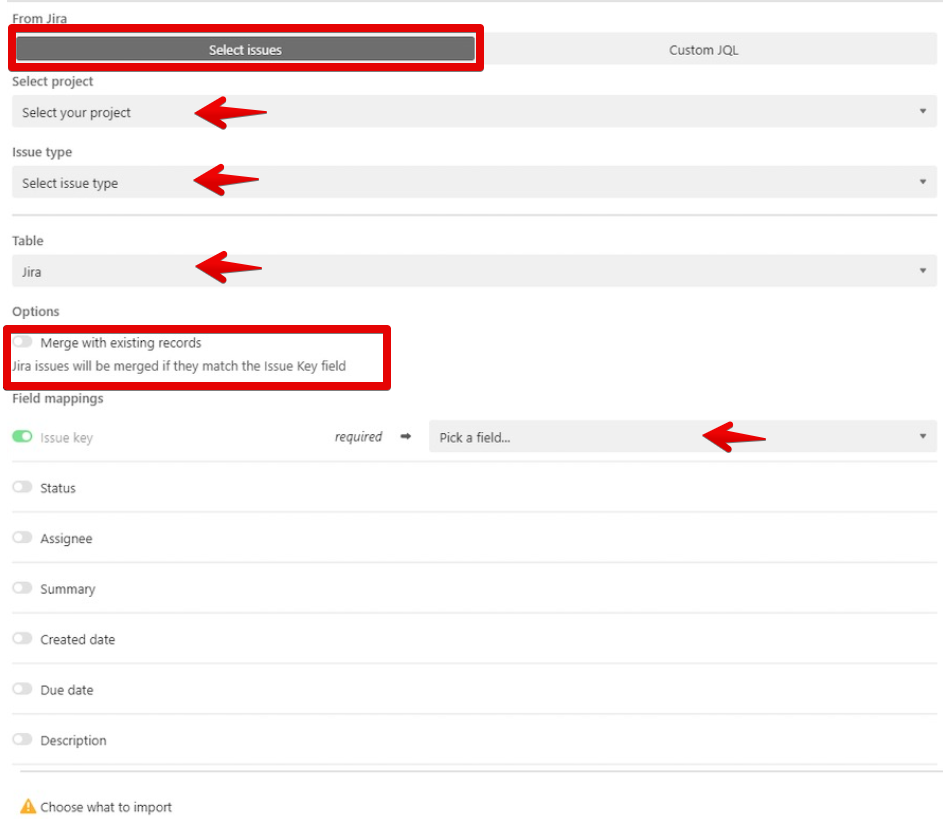
Adım 1: Konuları içe aktarın
Konuları iki şekilde içe aktarabilirsiniz:
Issues sekmesi:
- Select Project (Proje Seç): Jira Cloud'dan Airtable'a içe aktarmak istediğiniz projeyi seçin
- Issue Type (Konu Türü): İçe aktarmak istediğiniz konu türünü seçin
- Choose a Table (Tablo Seç): Aktif tablo varsayılan olarak seçilir ancak değiştirilebilir
- Merge records (Kayıtları birleştir):
- Kayıtları birleştirirseniz, içe aktarma her çalıştığında yalnızca yeni kayıtlar eklenir
- Kayıtları birleştirmezseniz, içe aktarma her çalıştığında yeni bir kayıt eklenir
- Bir Jira kaydı artık içe aktarma kriterlerine uymuyorsa tablodan güncellenmez veya kaldırılmaz
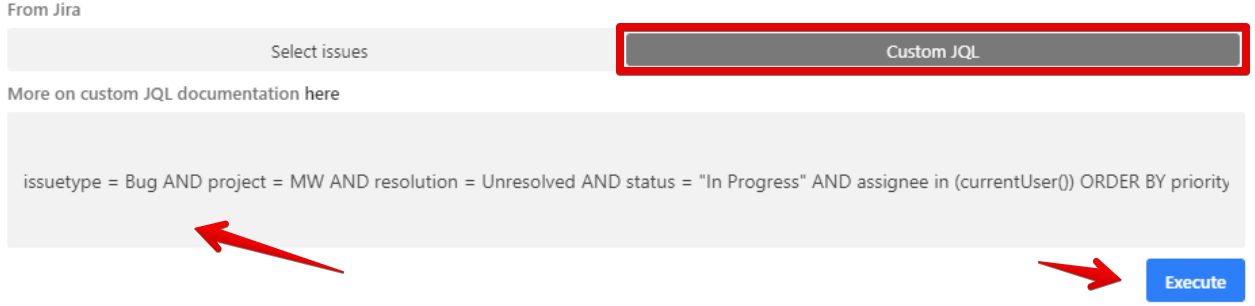
Custom JQL sekmesi:
- Jira Cloud uygulaması JQL (Jira Query Language) destekler. Jira'dan bu sekmeye özel sorguları kopyalayıp yapıştırın.
- Uygulama, artık JQL sonuçlarında görünmeyen bir Jira kaydını kaldırmaz veya güncellemez.
Adım 2: Alan eşleme
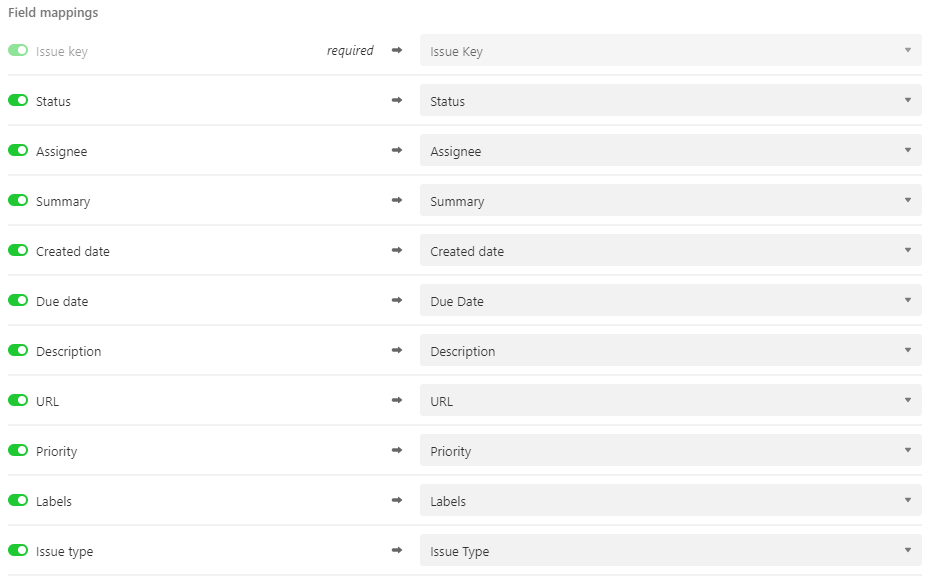
Jira ve Airtable arasındaki entegrasyon için desteklenen alan türleri (önerilen türler kalın yazılmıştır):
- Issue Key (Konu Anahtarı): Single Line, Long Text
- Status (Durum): Single Line, Long Text, Single Select
- Assignee (Atanan): Single Line, Long Text, Collaborator
- Summary (Özet): Single Line, Long Text
- Created Date (Oluşturma Tarihi): Single Line, Long Text, Date
- Due Date (Bitiş Tarihi): Single Line, Long Text, Date
- Labels (Etiketler): Single Line, Long Text, Multiple Select
- Description (Açıklama): Single Line, Long Text
- URL: Single Line, Long Text, URL, Link to another record
- Priority (Öncelik): Single Line, Long Text, Single Select
- Issue Type (Konu Türü): Single Line, Long Text, Single Select
Aklınızda tutulması gerekenler:
- Biçimlendirilmiş metin, kod, emoji'ler, gömülü ekler ve etiketlenmiş kullanıcılar biçimlendirilmemiş düz metin olarak görünür
- Jira alanlarını Airtable Multiple Select ve Single Select alanlarına içe aktarırken, içe aktarmadan önce Airtable'da seçenekleri belirtin
- Jira Cloud ayarlarında User Email Visibility Public olarak ayarlanmamışsa, atananlar boş olacaktır
Adım 3: Projenizi güncelleyin
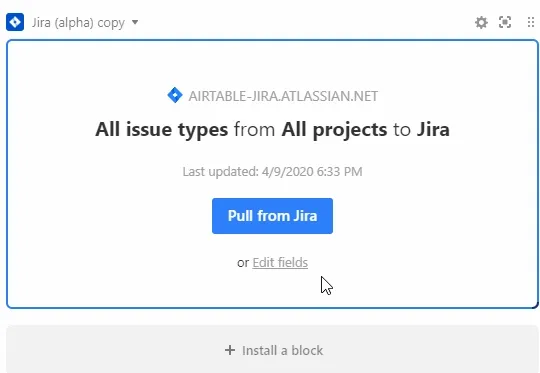
- Airtable kayıtlarını uygulama gösterge panelinden Jira Cloud uygulamasını kullanarak manuel olarak yenileyin. Son içe aktarma zamanını kontrol edebilir ve kayıtları güncelleyebilirsiniz.
- Sonraki içe aktarmalardan önce Jira ile eşleşecek şekilde yeni seçimleri içerecek şekilde Multiple Select ve Single Select alanlarını manuel olarak güncelleyin.
Adım 4: Öneriler
- Select Issues Tab'ı kullanarak her proje için farklı bir tablo oluşturun
- Her Jira projesinin kendi Jira Cloud uygulaması olmalıdır. Daha fazla uygulama gösterge paneli ekleyin ve organizasyon için yeniden adlandırın
- İçe aktarılan kayıtların düzgün şekilde güncellendiğinden emin olmak için All Issue Types ve Merge Records seçeneklerini seçin
- İçe aktarmadan önce Airtable'da tüm Multi-Select, Single Select ve Collaborators'ı ayarlayın
- Kayıtların en son ne zaman değiştirildiğini izlemek için Last Modified Time alanı ekleyin
- Jira Cloud'da değişiklik yapmadan önce herhangi bir Multi-Select veya Single Select alanındaki seçimleri güncelleyin
- Sorunlardan kaçınmak için Date Field'daki tarih biçimlendirmesinin Jira Cloud ile eşleştiğini doğrulayın
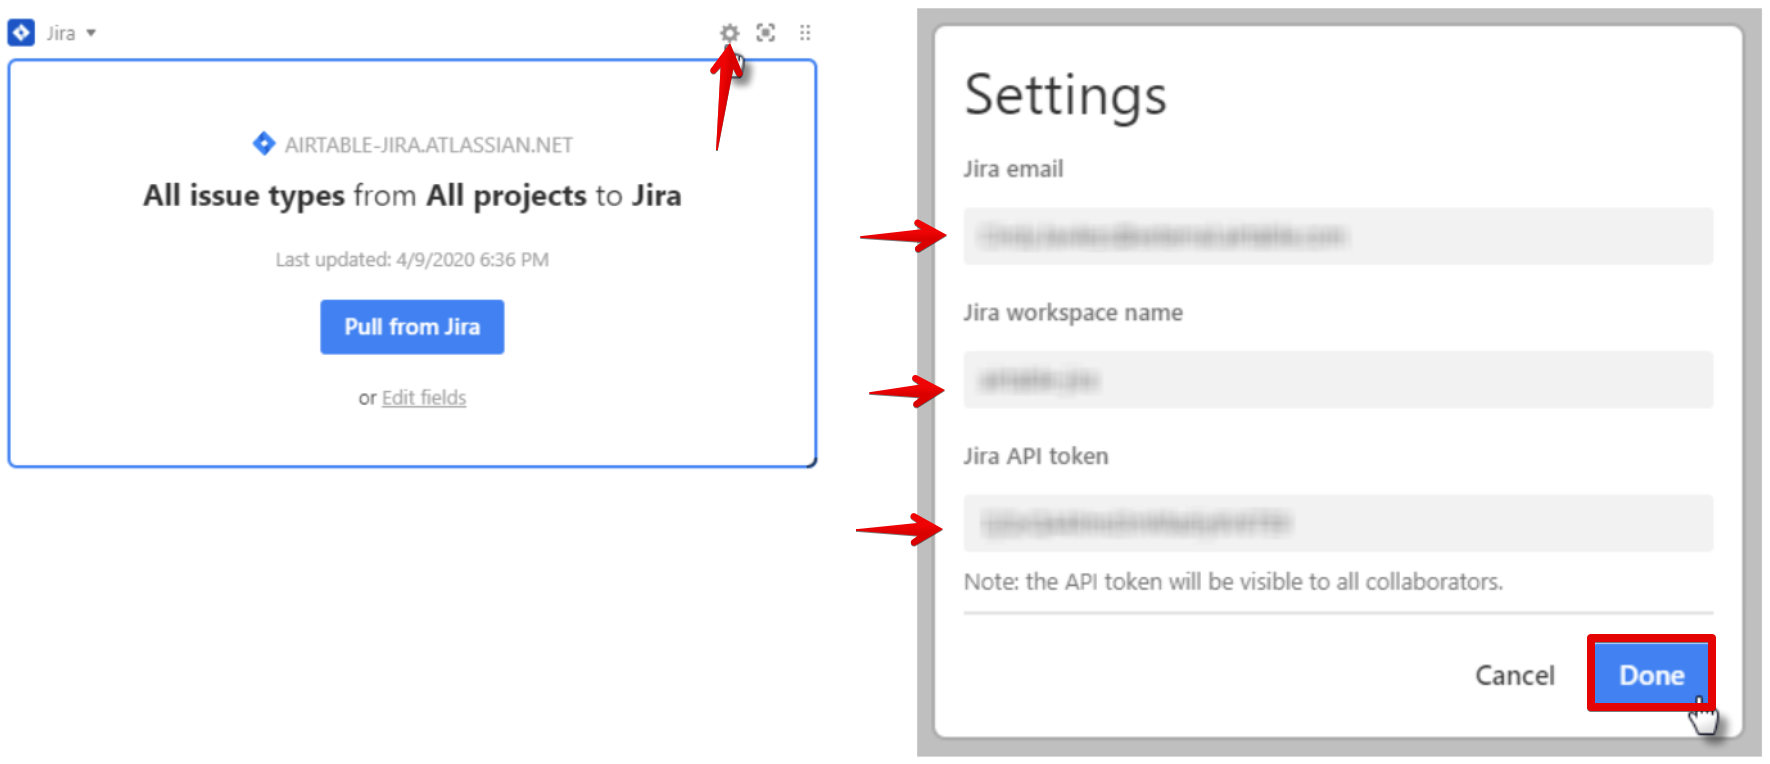
Adım 5: Jira API kimlik bilgilerini güncelleyin
Yeni kimlik bilgileri eklemek için uygulamanızın sağ üst köşesindeki ayarlar çarkına tıklayın.
Avantajlar ve dezavantajlar
Avantajlar:
- Her 5 dakikada bir veya talep üzerine otomatik 1 yönlü senkronizasyon
- İlk kurulumdan sonra otomatik süreç
- İyi görsel kullanıcı arayüzü
Dezavantajlar:
- Yeni başlayanlar için büyük öğrenme eğrisi
- Karmaşık ilk kurulum ve yapılandırma
- Gerçek zamanlı senkronizasyon yok
- Entegrasyonların ve otomasyonların sınırlı özelleştirmesi
- Formül oluşturucu yok
- Maliyet, kullanıcı ve satır sayısına göre ölçeklenir
Özel özellikler:
- Çok sayıda uygulama mevcut
- Özel uygulamalar oluşturun
- Çok sayıda otomasyon
- Ekip işbirliği
Coda.io
Coda.io, kelime işleme, elektronik tablolar ve veritabanlarını içeren bulut tabanlı bir belge düzenleyicisidir. Elektronik tabloları, sunumları, uygulamaları ve belgeleri birleştirebileceğiniz bir tuvaldır. Slack ve Gmail gibi üçüncü taraf hizmetler entegre edilebilir.
Prosedür
-
Jira hesabınızı bağlayın: Sağ üst köşedeki "Explore" seçeneğine tıklayın, Packs'i seçin, ardından Jira'yı seçin. Bağlantıyı doğrulamak için oturum açın.
-
Pack tablosu ekleyin: Hızlı ekleme menüsünü açmak için belge tuvalinizde
/yazın. "Jira" yazın ve listeden Pack tablosunu seçin. -
Coda'da konular oluşturun: Jira projelerinizde yeni konular oluşturmak için bir düğme kullanın. Bu düğmeyi bir tabloya veya belge tuvaline yerleştirin. Proje kurulumunuza göre konu türünü ve özetini belirtin.
-
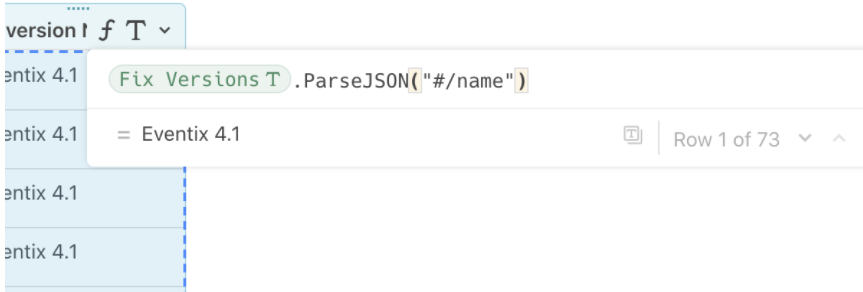
JSONParse() kullanarak konu verilerini çıkarın: İç içe JSON olarak döndürülen Jira'daki özel alanları çıkarmak için bir formül kullanın. Bu örnek, "Fix Versions"tan "Name" alanını çıkarır. ParseJSON formülü hakkında daha fazla bilgi.
Avantajlar ve dezavantajlar
Avantajlar:
- Team ve enterprise planlarında her saat otomatik 1 yönlü senkronizasyon veya manuel senkronizasyon
- İlk kurulumdan sonra otomatik süreç
Dezavantajlar:
- Ağır yüklenmiş belgeler, kurumsal düzeydeki müşteriler için performansı ve kararlılığı etkileyebilir
- Gerçek zamanlı senkronizasyon yok
- Pro ve ücretsiz planlar için manuel senkronizasyon
- Ücretsiz ve pro planlar için ayda yirmi senkronizasyon
- Karmaşıklığı net bir organizasyon stratejisi olmadan yönetmek zordur
Özel özellikler:
- Çok sayıda uygulama mevcut
- Tek bir yerde her türlü klasör, proje veya belge oluşturun
- Grafikler, tablolar, haritalar, medya silin, paylaşın, dışa aktarın, ekleyin
- Bir proje içinde sınırsız bireysel belge
- Formüller ve özelleştirme ile yüksek esneklik
- Gantt grafiği, takvim, Kanban panosu veya diğer görselleştirmeler olarak yapılandırın
- İçe aktarılacak ve kullanılacak birçok farklı şablon
ProductPlan
ProductPlan, ürün yöneticilerinin ürün stratejisini planlamaları, görselleştirmeleri ve açıklamaları için bir yol haritası aracıdır. Dakikalar içinde ürün yol haritaları oluşturmak ve paylaşmak için sürükle ve bırak arayüzüne sahiptir.
Prosedür
Adım 1: ProductPlan yapılandırması
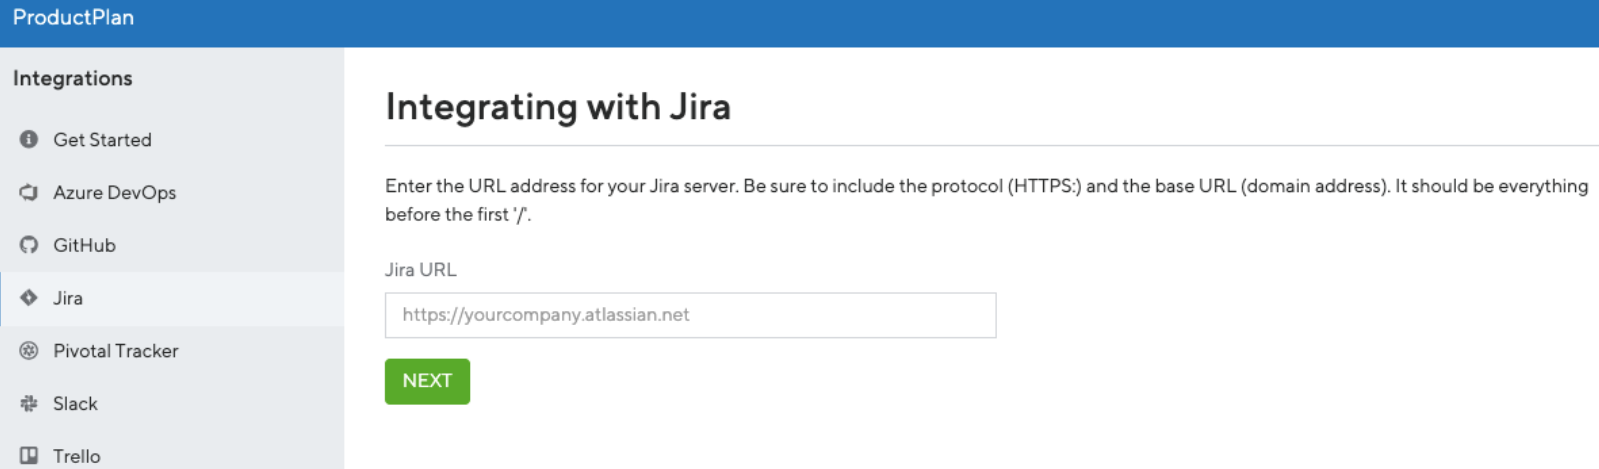
ProductPlan'in entegrasyonlar sayfasına gidin, "Begin Jira Integration" seçeneğini seçin ve Jira temel URL'nizi yazın. Kurulumu tamamlamak için gereken Consumer ve Public Keys'i alacaksınız.
Adım 2: Jira Cloud yapılandırması
- Dashboards sayfanızın solundaki menüden Jira Settings (Jira Ayarları) seçeneğine erişin
- Jira Settings menüsünden Products (Ürünler) seçeneğini seçin
- Integrations altında Application Links seçeneğini seçin
- URL alanına https://app.productplan.com yazın
- Create new link (Yeni bağlantı oluştur) seçeneğini seçin. "No response was received from the URL you entered" mesajını görürseniz Continue (Devam Et) düğmesine tıklayın
- Application Name alanına ProductPlan girin
- Uygulama türü olarak Generic Application seçin
- Kalan tüm alanları boş bırakın. Doldurmayın. Continue (Devam Et) düğmesine tıklayın
- Actions sütununda, ProductPlan uygulamanız için Edit (Düzenle) simgesine tıklayın
- Incoming Authentication seçeneğini seçin (tüm alanları görmek için alta kaydırın)
- ProductPlan entegrasyonlar sayfanızdan aşağıdaki değerleri doldurun:
- Consumer Key (Tüketici Anahtarı): (ProductPlan tarafından sağlanır)
- Consumer Name (Tüketici Adı): ProductPlan
- Public Key (Genel Anahtar): (ProductPlan tarafından sağlanır – başlangıç ve bitiş sertifika satırları dahil her şeyi kopyalayın)
- Consumer Callback URL: https://app.productplan.com/auth/jira/callback
- Save (Kaydet) düğmesine tıklayın
- ProductPlan'e dönün ve alttaki Next Step (Sonraki Adım) düğmesine basın. Hesabınızı doğrulamak için Allow (İzin Ver) düğmesine tıklayın
Adım 3: Jira Server yapılandırması
Jira Server'ınıza bağlanmak için güvenlik duvarınızda ProductPlan IP adreslerini beyaz listeye ekleyin. Bu IP adreslerini kullanarak 443 portu üzerinden sunucuya bağlanın:
- [52.5.38.201]
- [52.7.247.138]
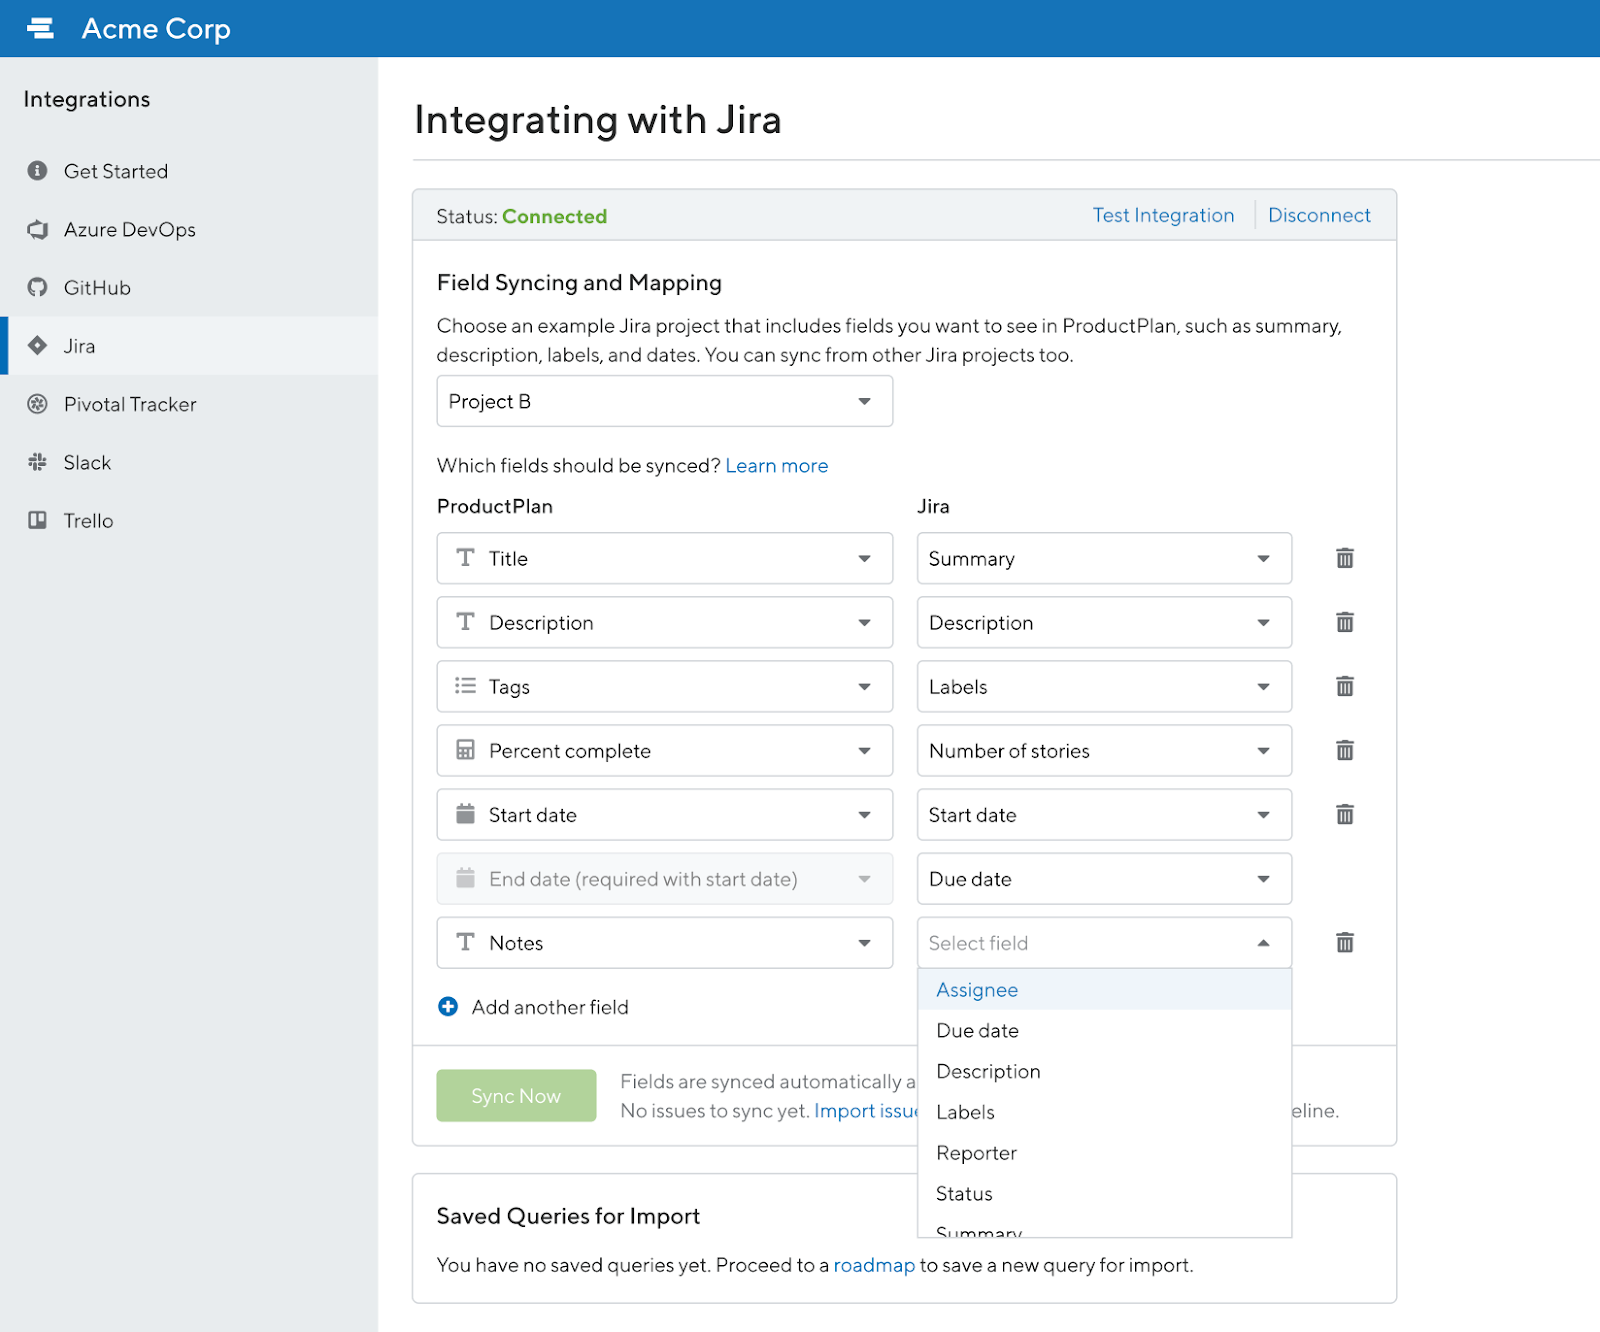
Jira için özel alan eşleme:
- ProductPlan'e senkronize etmek istediğiniz tüm alanları içeren bir Jira projesi seçin (özet, açıklama, etiketler, tarihler)
- Basic Plans için varsayılan eşleme alanları sabittir: Title, Description, Tags, Percent Complete, Start Date, End Date ve Notes
- Professional ve Enterprise Plan kullanıcıları Jira alan eşlemesini özelleştirebilir ve Custom Text Fields dahil yeni alanlar ekleyebilir
Jira'yı ProductPlan çubuklarına bağlayın:
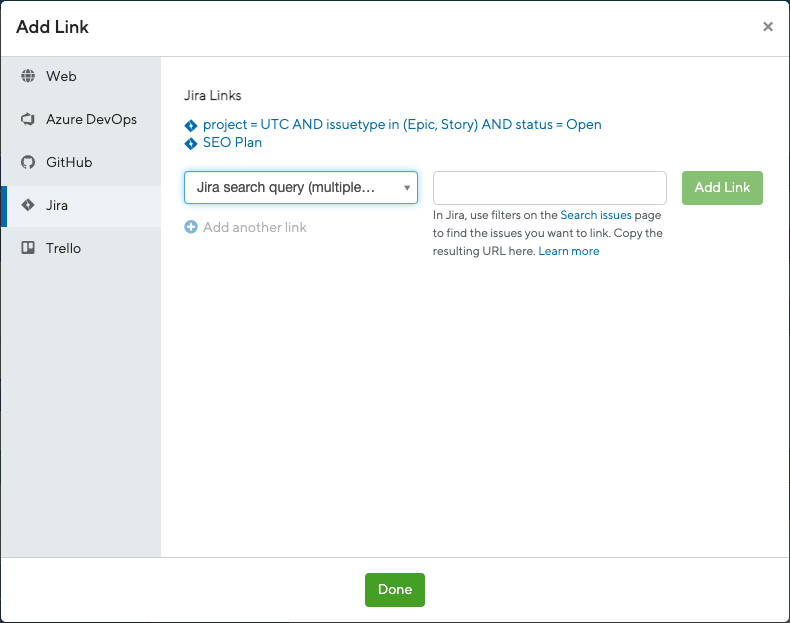
-
Bir Bar veya Container'a tıklayın ve mevcut bir Epic veya konuya bağlantı vermek için alttaki "Links" seçeneğine tıklayın
-
Jira sekmesine tıklayın:
- Jira konularını ID veya özet metnine göre arayın
- Search issues sayfanızdan bir Jira sorgusunu kopyalayıp yapıştırın
-
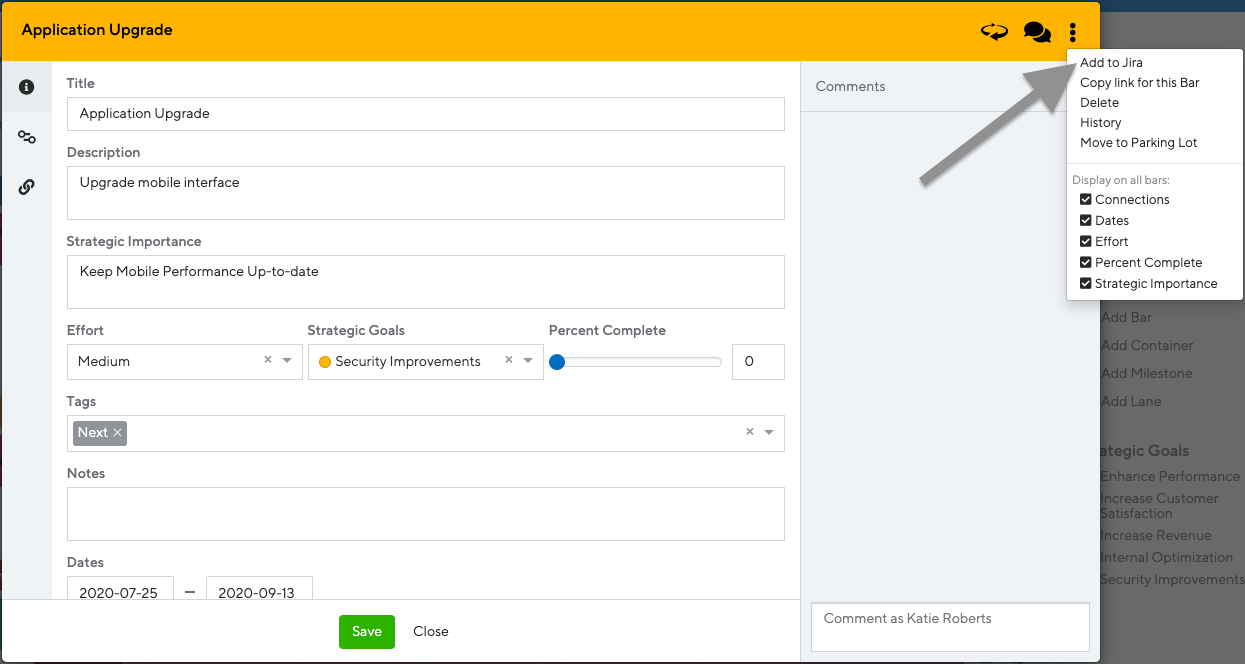
Yeni bir konu oluşturmak ve Jira'ya göndermek için:
- Sağ üstteki üç noktaya tıklayın
- "Add to Jira" seçeneğini seçin
Jira senkronizasyonu:
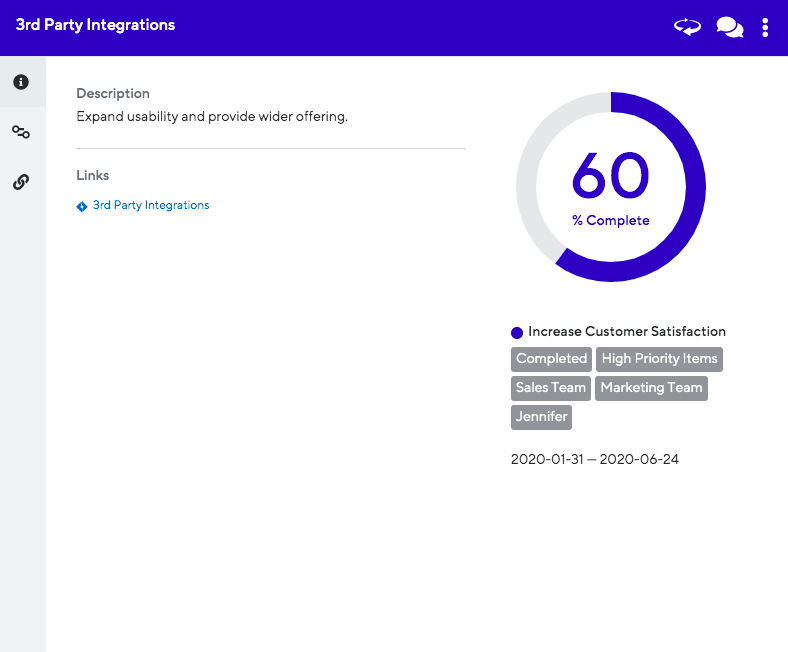
ProductPlan, Jira verilerini otomatik olarak bir Bar veya Container'a güncelleyebilir. Percent Complete'i şunlara göre senkronize edin:
- Bir Epic'te tamamlanmış hikayelerin sayısı
- Bir Epic veya Issue'daki tüm hikayelerin hikaye puanları
Bu seçenekleri entegrasyonlar sayfanızda yapılandırın. Yol haritası her gün saat 05:00 UTC'de otomatik olarak senkronize edilir veya Sync Now'a tıklayarak manuel olarak senkronize edin. Alanları senkronize etme hakkında daha fazla bilgi.
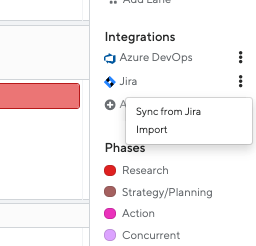
Jira konularını ProductPlan'e içe aktarın:
Seçenek 1: Table Layout
- Parked bölümüne tıklayın
- Üstteki Import düğmesini seçin
- Jira sekmesini seçin
Seçenek 2: Timeline veya List görünümü
- Integrations altındaki Jira'nın sağındaki üçlü üç noktaya tıklayın
- Import'a tıklayın (Table Layout'un Parked bölümüne götürür)
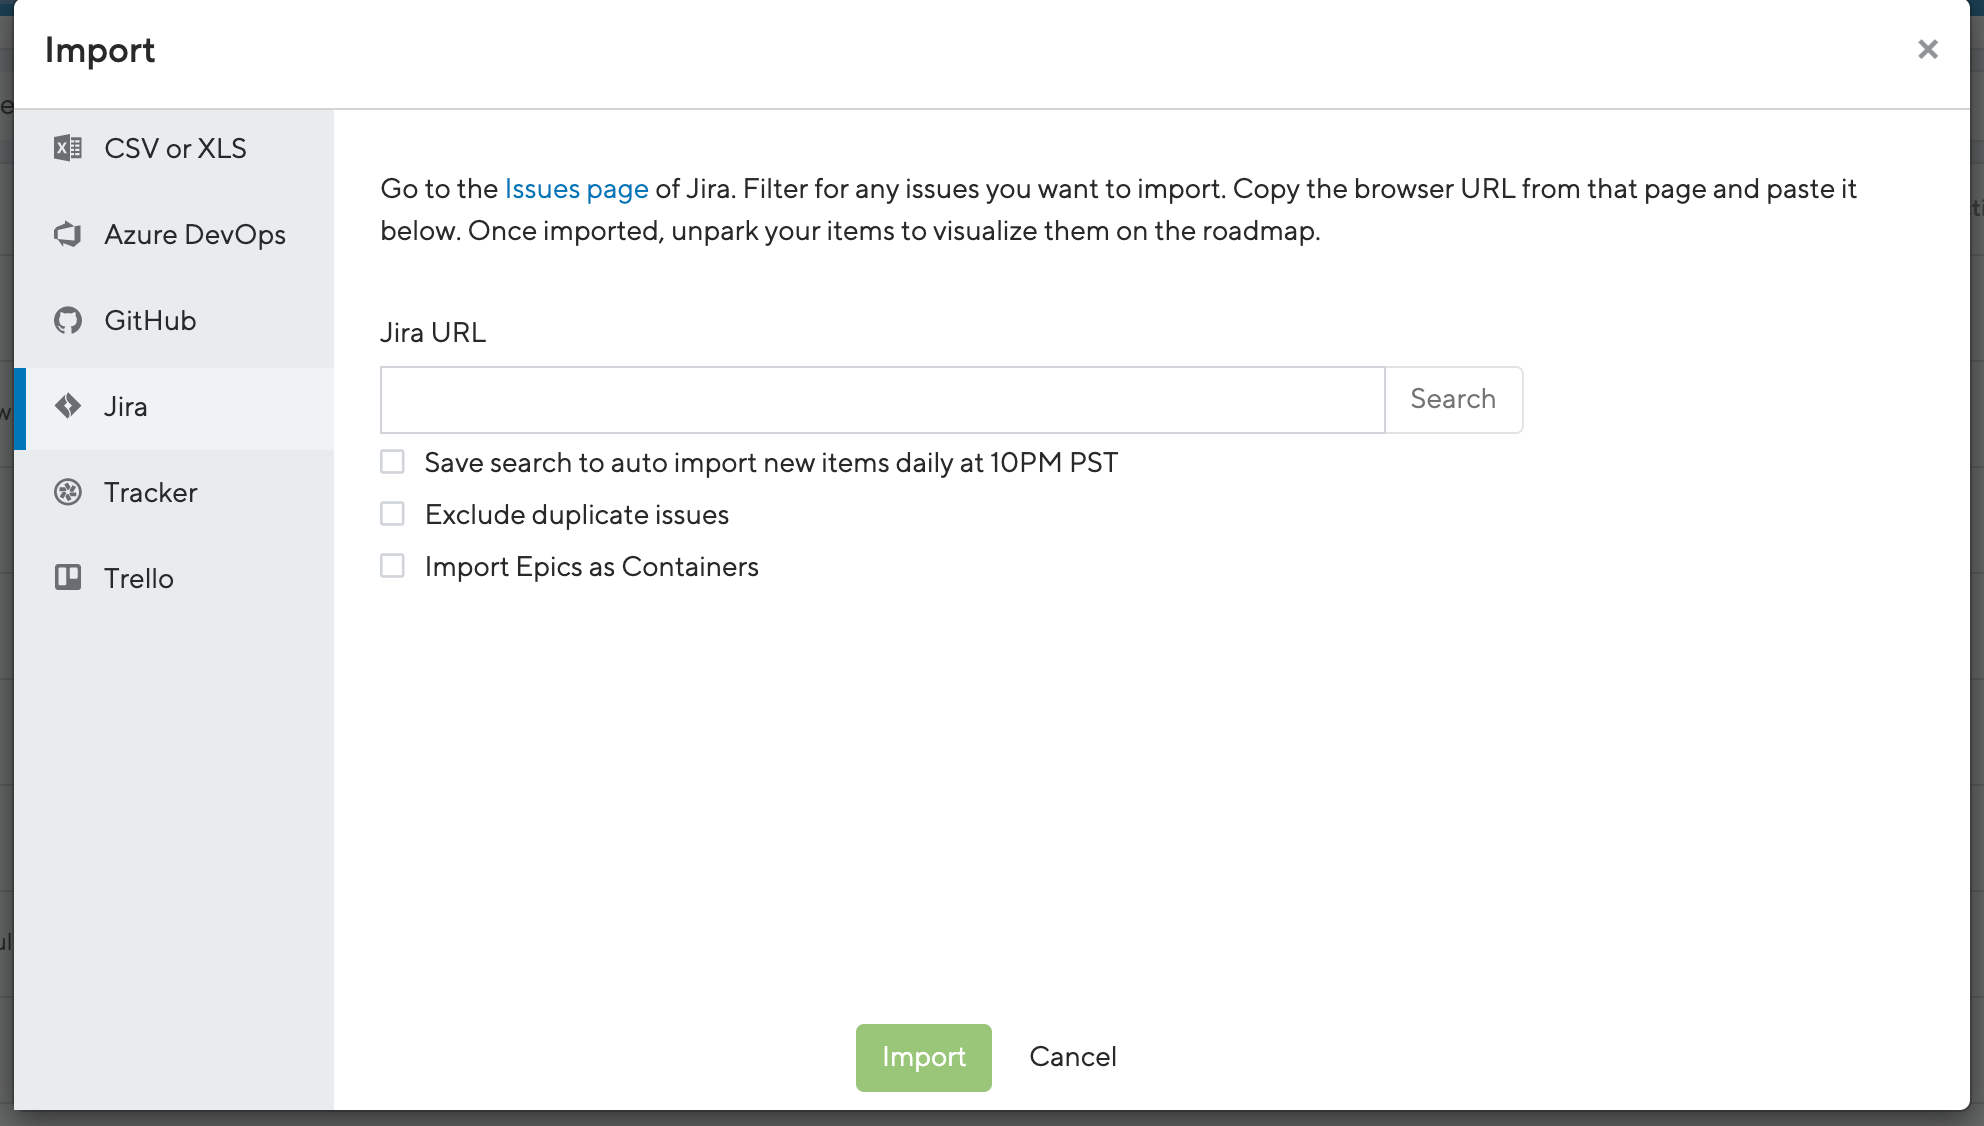
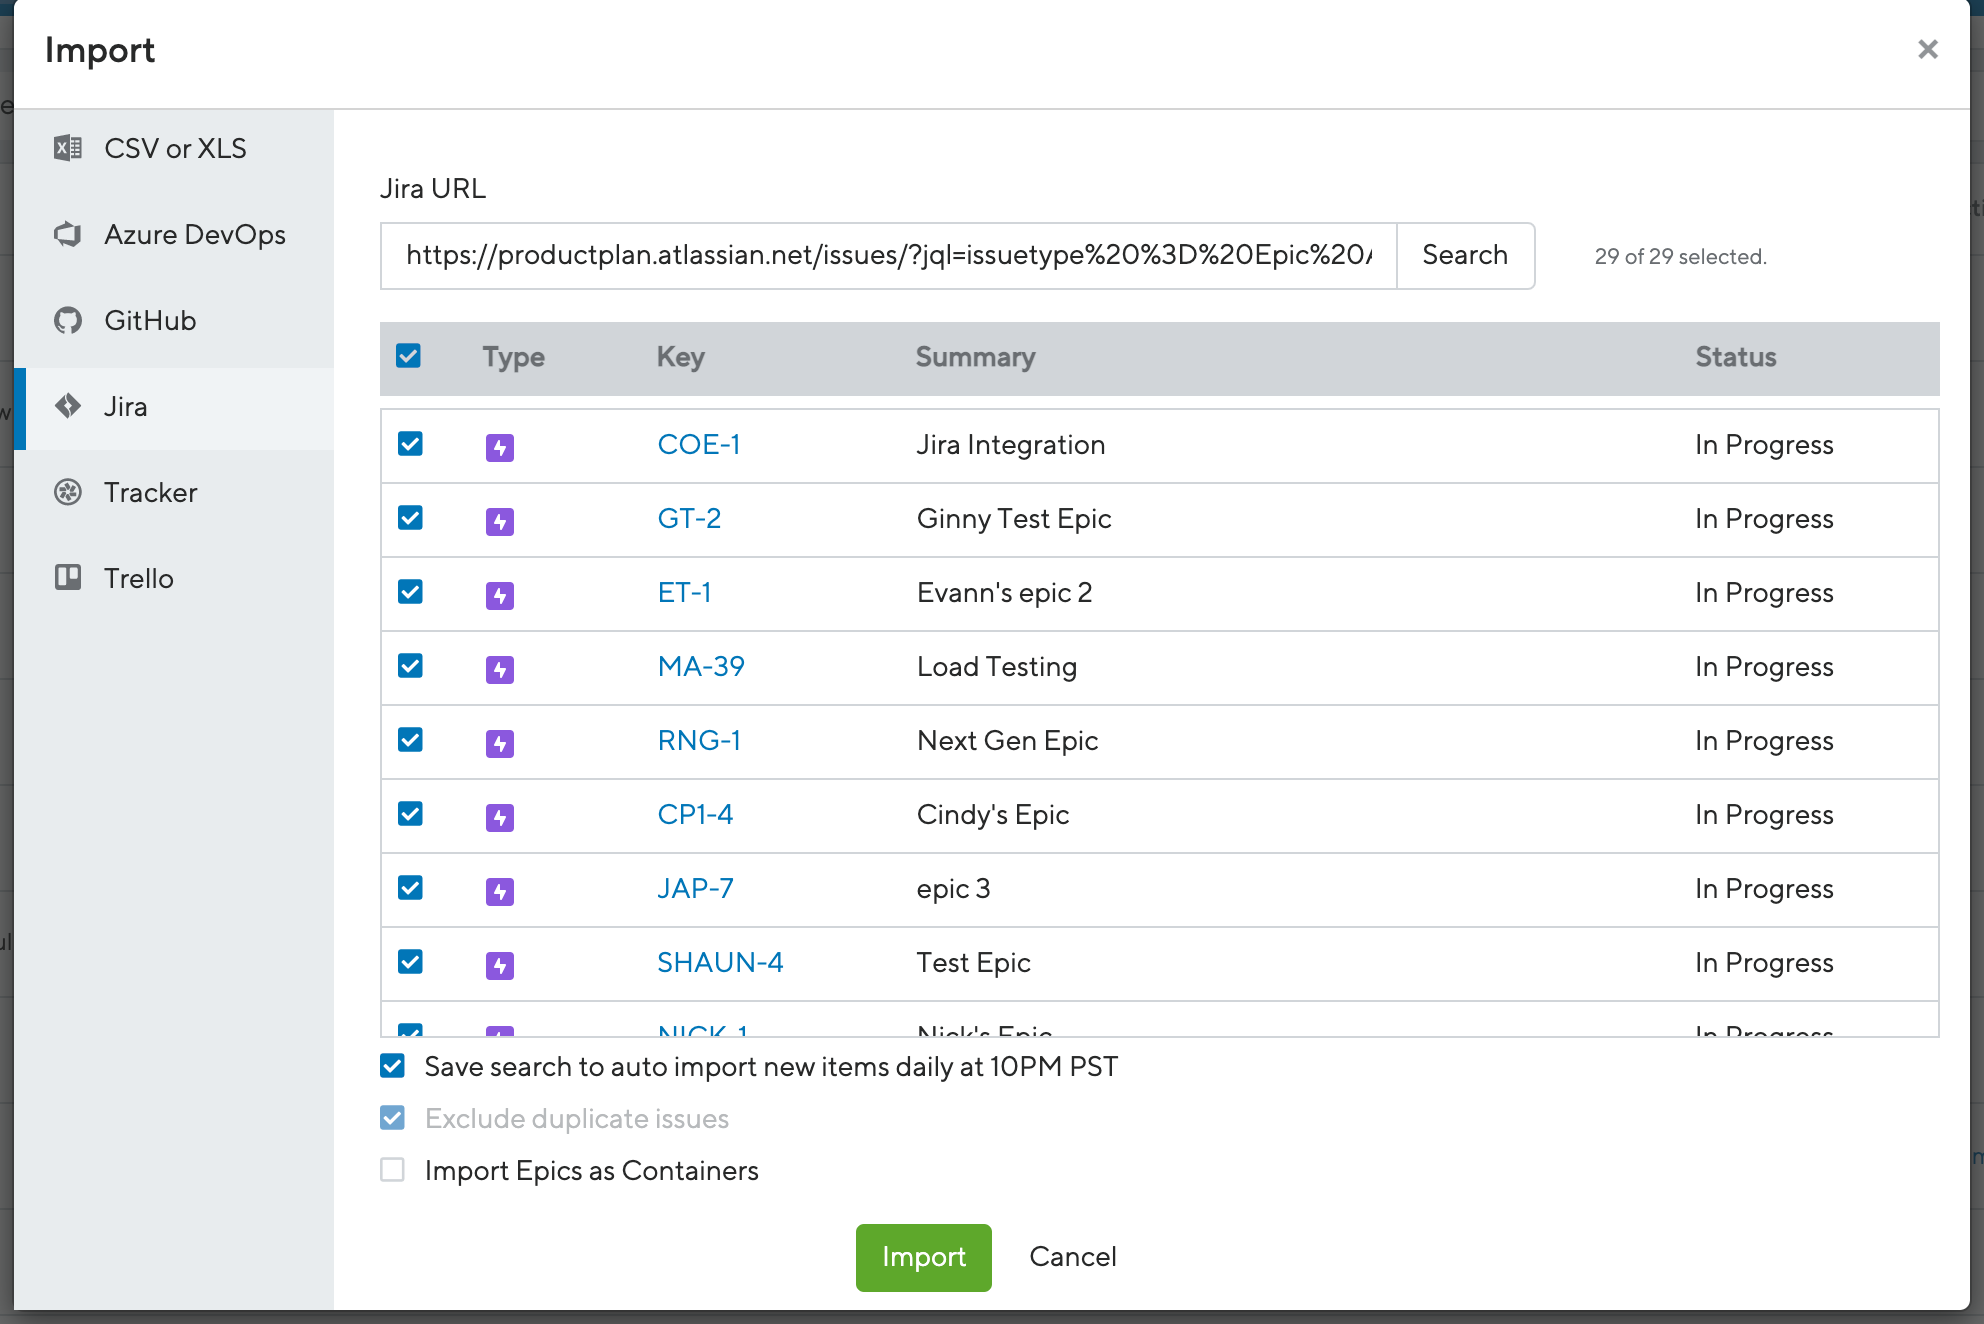
İçe aktarma prosedürü:
-
İçe aktarmak istediğiniz Jira konularını arayın. Jira konular sayfanızda farklı konuları filtreleyin veya Favorite Filters'tan seçim yapın
-
Alt hikayeleri içe aktarmak ve Jira hiyerarşisini korumak için "Import Epics as Containers" seçeneğini seçin
-
Jira'nın önceden tanımlanmış filtreleri desteklenmez (filtre URL'sinde negatif değerlerle tanımlanır)
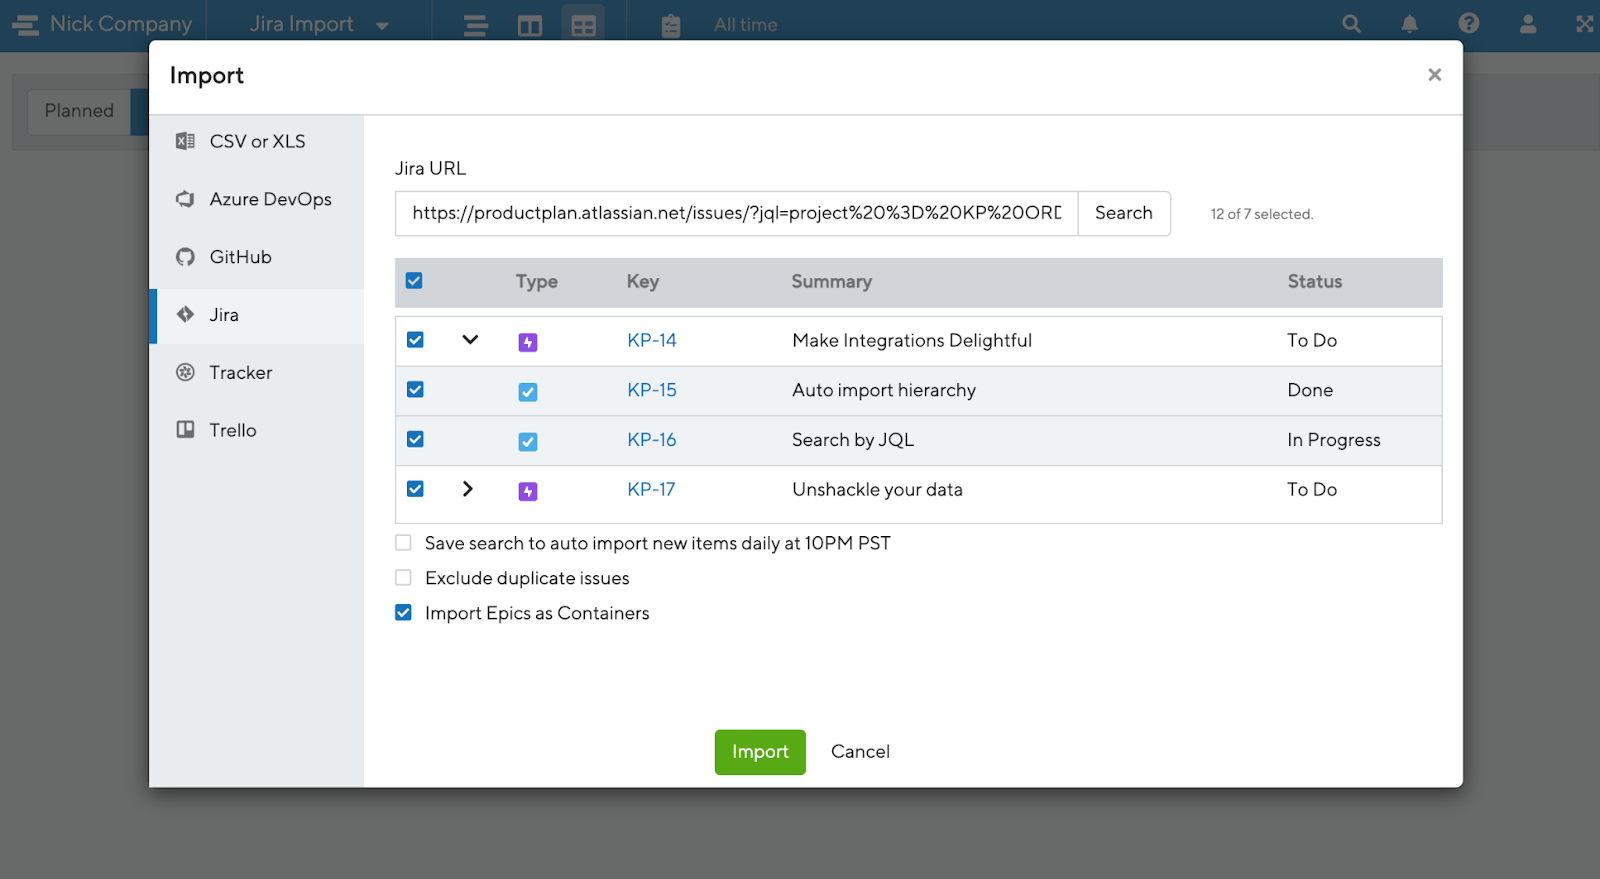
-
Jira konular sayfanızdaki tarayıcı URL'sini kopyalayıp ProductPlan'in Import ekranına yapıştırın
-
Otomatik günlük içe aktarmalar için "Save search to auto-import new items daily at 10 a.m. PST" seçeneğini açın
-
Konular, Table Layout'un Parked bölümünde çubuklar olarak içe aktarılır, entegrasyonlar sayfanızda seçtiğiniz alanlara bağlanır ve Jira konularına bağlantılar oluşturur
-
Öğenin Jira'da sahip olduğu tüm etiketler ProductPlan'de etiket olarak içe aktarılır. Etiketler mevcut yol haritası etiketleriyle eşleşirse, hemen eklenir
-
Fikirleri Parked alanına sürükleyip bırakın veya öğeleri Planned bölümüne aktarmak için "unpark" edin; burada yol haritanızda çubuklar olarak görünürler
-
Yüzde tamamlamayı Jira'daki bağlantılı konularla senkronize edin:
-
Tarihleri içe aktarmak için:
- Kullanmak istediğiniz tarih eşlemelerine sahip bir proje seçin
- Start ve End date açılır menülerinden o projedeki tarih alanlarını seçin
Çubukların senkronizasyonu:
Jira'ya bağlı herhangi bir yeni ProductPlan Çubuğu veya Container'ı, senkronizasyon kurulduktan sonra otomatik olarak bağlanır. Önceden bağlanmış Çubuklar veya Container'lar için senkronizasyonu manuel olarak yapılandırın:
- Details ekranında, senkronizasyonu devre dışı bırakmak için bağlantı simgesine tıklayın. Percent Complete'i manuel olarak ayarlayın.
- Senkronizasyonu etkinleştirmek için bağlantı simgesine tıklayın. Percent Complete, bir sonraki günlük senkronizasyonda veya Integrations sayfasında Sync Now'a tıkladığınızda güncellenir.
Avantajlar ve dezavantajlar
Avantajlar:
- Günde bir kez otomatik 1 yönlü senkronizasyon veya manuel senkronizasyon
- İlk kurulumdan sonra otomatik süreç
Dezavantajlar:
- Gerçek zamanlı senkronizasyon yok
- Karmaşık ilk kurulum ve yapılandırma
- Ücretsiz plan yok
- İşbirliği için ücretli hesap gereklidir
- Çok fazla araç ve özellik öğrenme eğrisi gerektirir
Özel özellikler:
- Açık görselleştirme ile yol haritaları oluşturun
- Çok sayıda şablon mevcut
- Sürükle ve bırak yol haritası oluşturma
- Özelleştirilebilir düzenler
- İşbirliği için kolay yol haritası paylaşımı
- Paydaş geri bildirimi için sınırsız görüntüleyici hesapları
- Maliyet karşısında fayda önceliklendirme modeli
Notion
Notion, ortak iş uygulamalarını tek bir araçta birleştiren bir araçtır. Notları, veritabanlarını, kanban panolarını, wikileri, takvimleri ve hatırlatıcıları yönetebilirsiniz. Kullanıcılar, bilgi yönetimi, not alma, veri yönetimi ve proje yönetimi sistemleri geliştirmek için bileşenleri bağlayabilir.
Prosedür
Gereksinimler:
Notion'ın Jira ile entegrasyonu yerel olarak desteklenmez. Notion hesabınızı Jira ile bağlamak için Automate.io gibi üçüncü taraf bir otomasyon aracı kullanın.
Süreç:
-
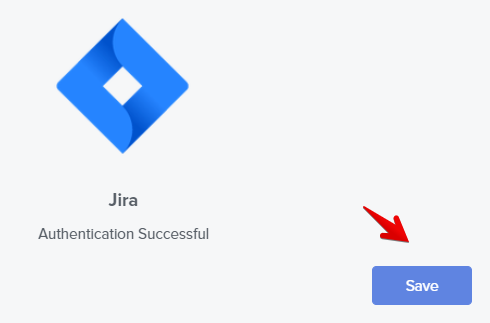
Notion, Jira ve Automate.io hesaplarınıza giriş yapın
-
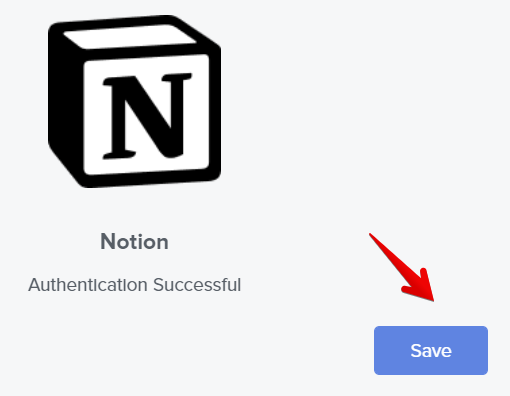
Notion'ı bağlayın:
- Automate.io'da Apps sekmesini seçin ve Add a New App'e tıklayın

- Notion'ı arayın ve seçin
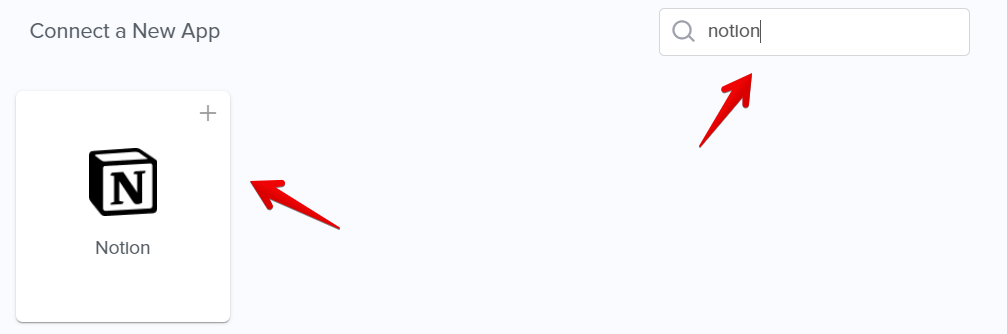
- Açılan pencereden, Automate.io'nun Notion hesabınıza erişmesine izin verin
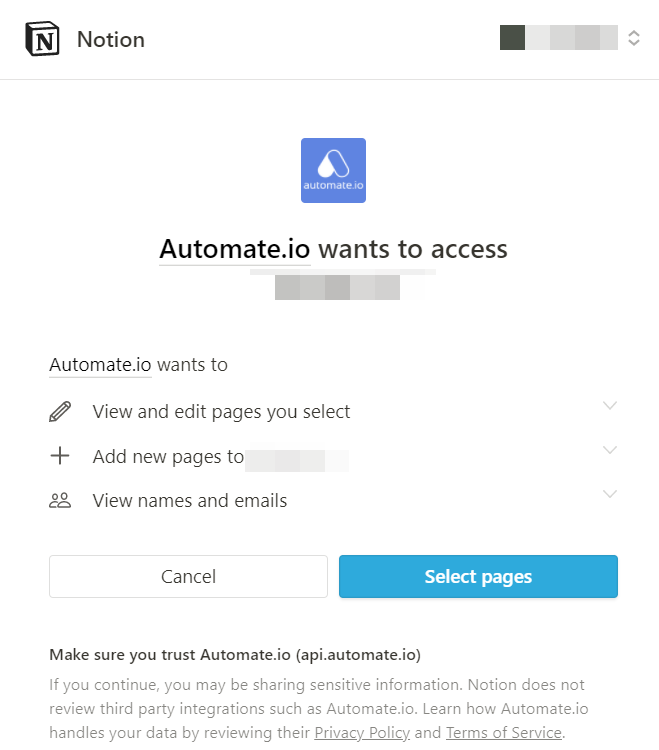
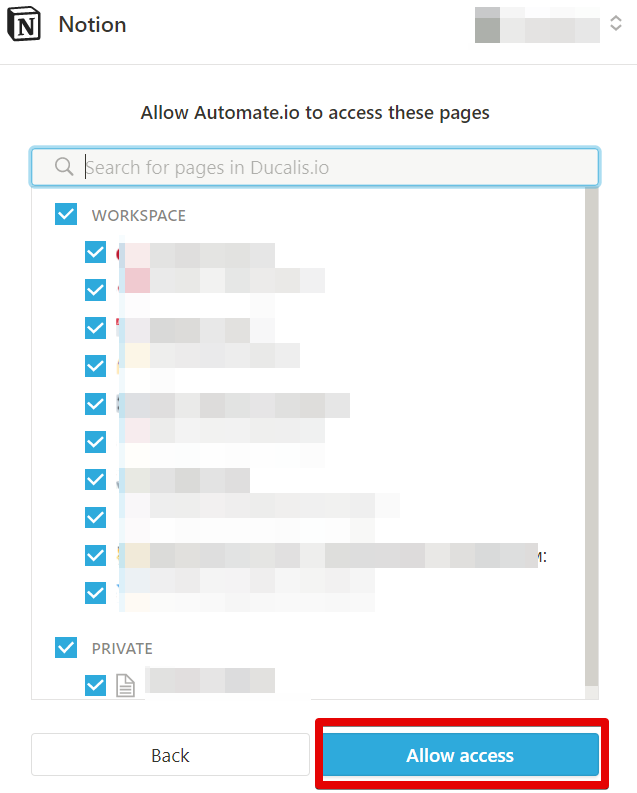
- Save düğmesine tıklayın
- Automate.io'da Apps sekmesini seçin ve Add a New App'e tıklayın
-
Jira'yı bağlayın:
- Automate.io'da Apps sekmesini seçin ve Add a New App'e tıklayın
- Jira'yı arayın ve seçin

- Açılan pencereden, Automate.io'nun Jira hesabınıza erişmesine izin verin. Jira'da bir API token oluşturmanız gerekecektir. Daha fazla bilgi edinin.
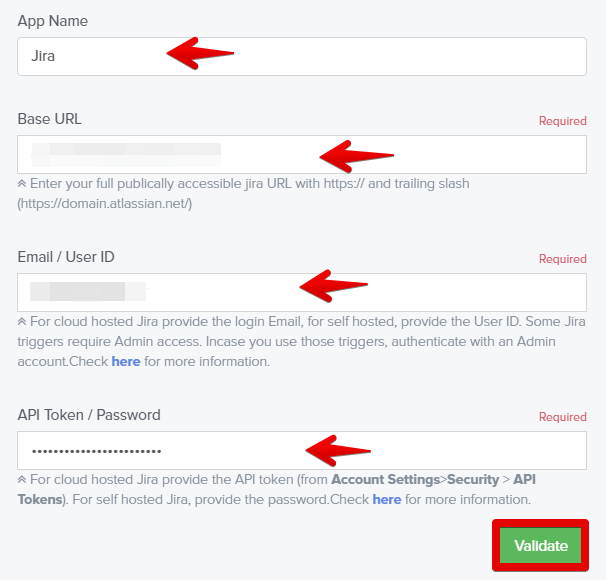
- Save düğmesine tıklayın
-
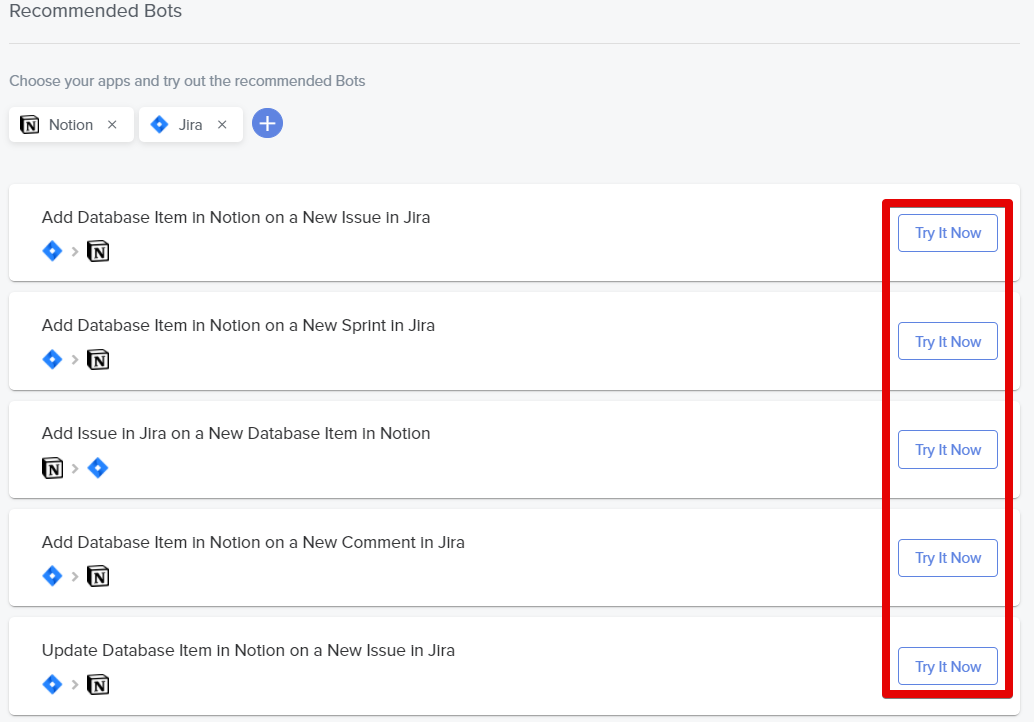
Entegrasyonunuzu oluşturun:
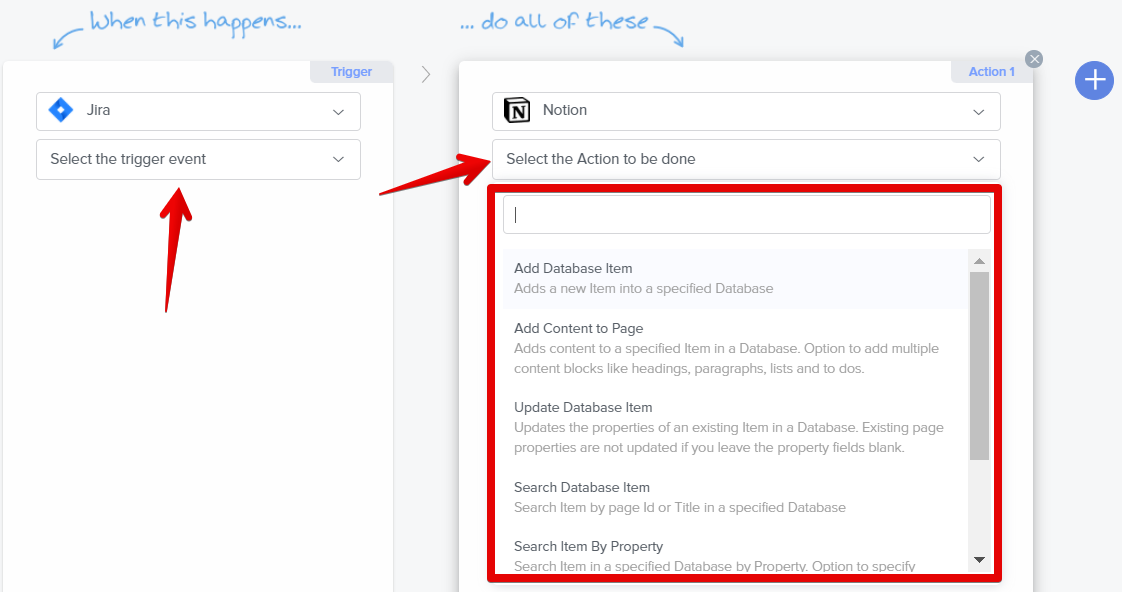
Seçenek 1: Önceden oluşturulmuş entegrasyon botu kullanın
- Gösterge panelinize gidin
- Artı işaretine tıklayın
- Notion'ı arayın ve eklemek için tıklayın
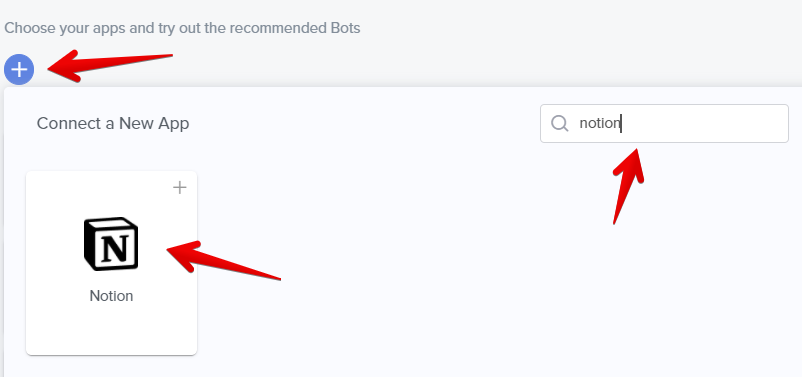
- Artı işaretine tıklayın
- Jira'yı arayın ve eklemek için tıklayın
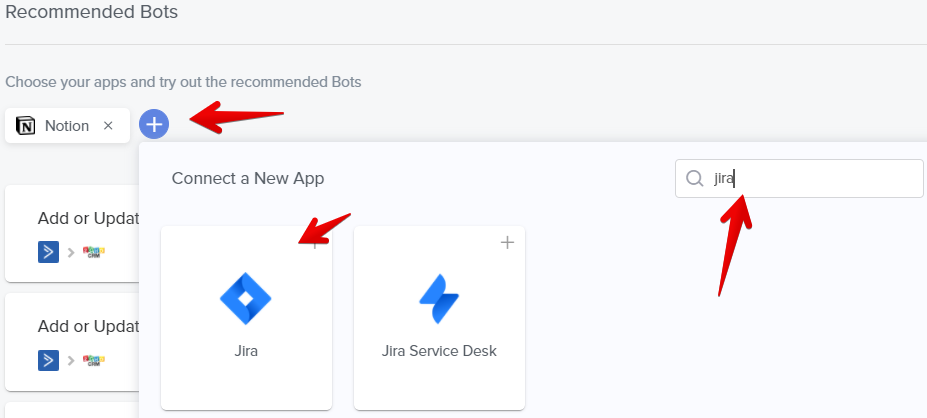
- Önceden oluşturulmuş botların bir listesi oluşturulacaktır. İstenen entegrasyonu kullanmak için Try It Now'a tıklayın
- İstenen tetikleyiciyi ve sonuç eylemini ayarlayın
- Gerekli Input Fields'ı doldurun
- Gerekli Output Fields'ı doldurun
- Ek eylemler veya uygulamalar eklemek için artı işaretine tıklayın
- Botunuzu yapılandırmayı bitirdiğinizde Save'e tıklayın
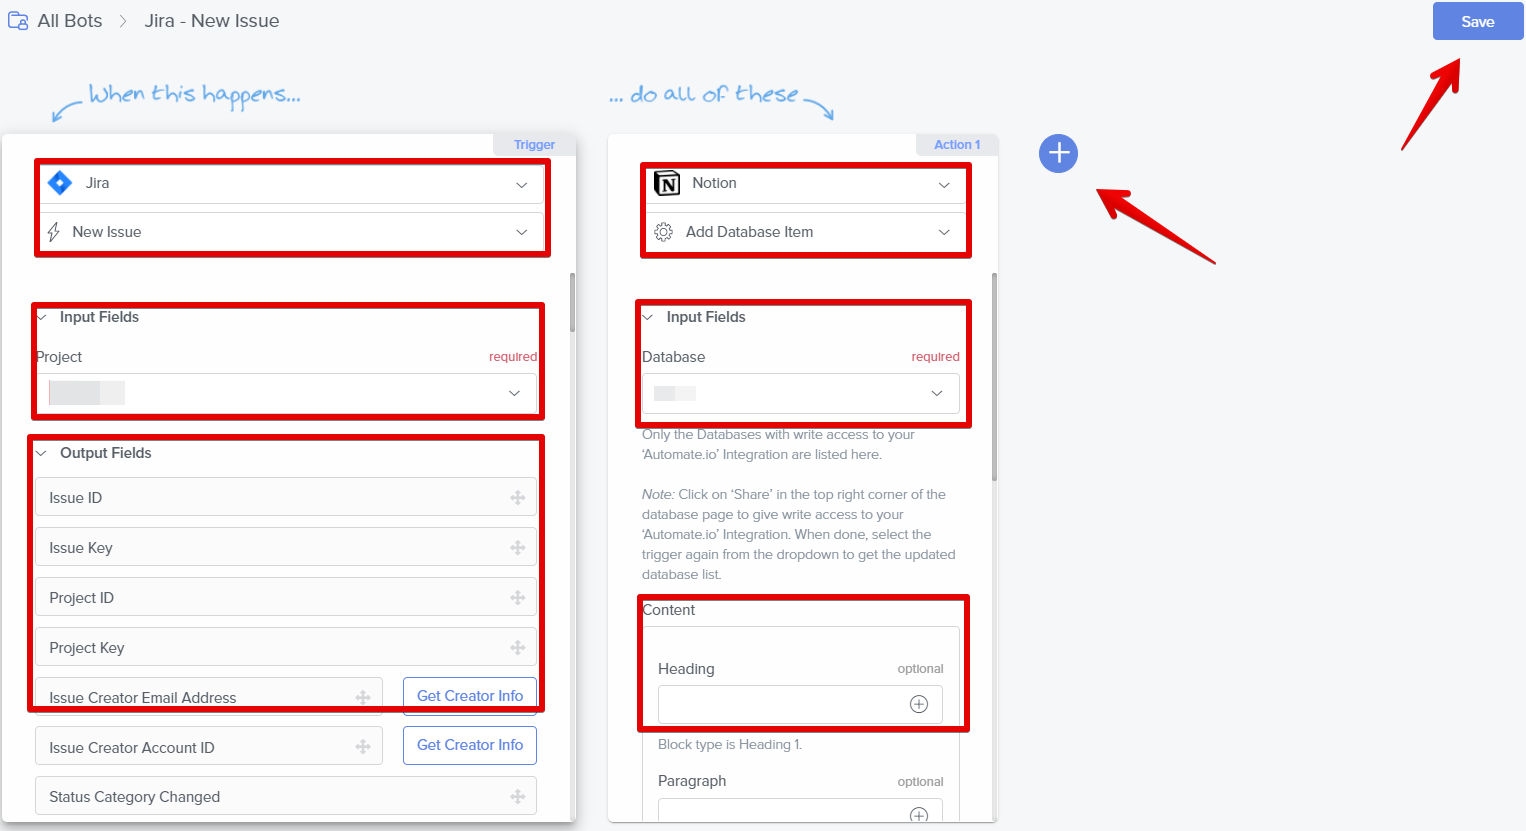
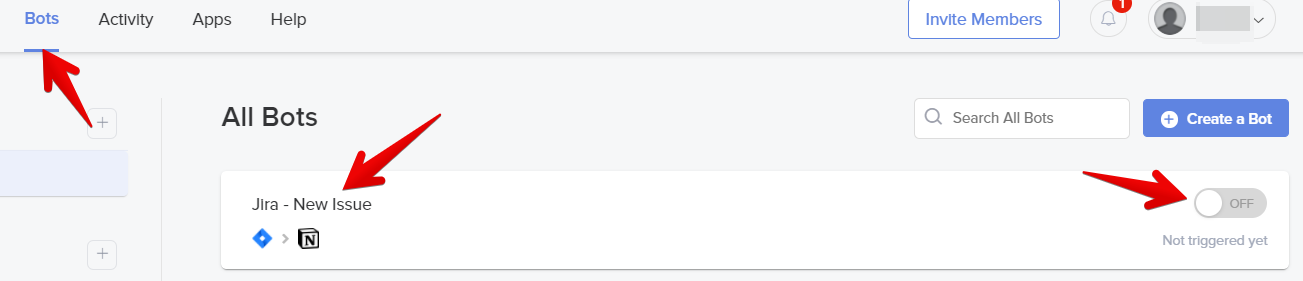
- Botunuz Bots sekmesinin altında mevcuttur. Etkinleştirmek veya devre dışı bırakmak için anahtara tıklayın veya düzenlemek için bota tıklayın
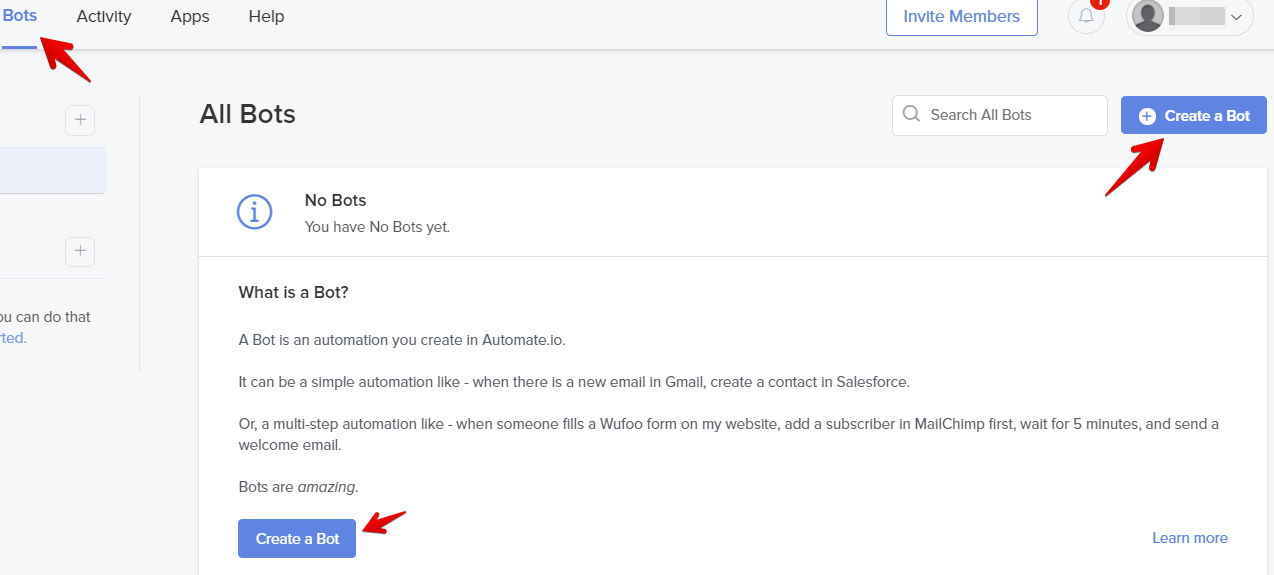
Seçenek 2: Özel entegrasyon botu oluşturun
- Bots sekmesini seçin ve Create a Bot'a tıklayın
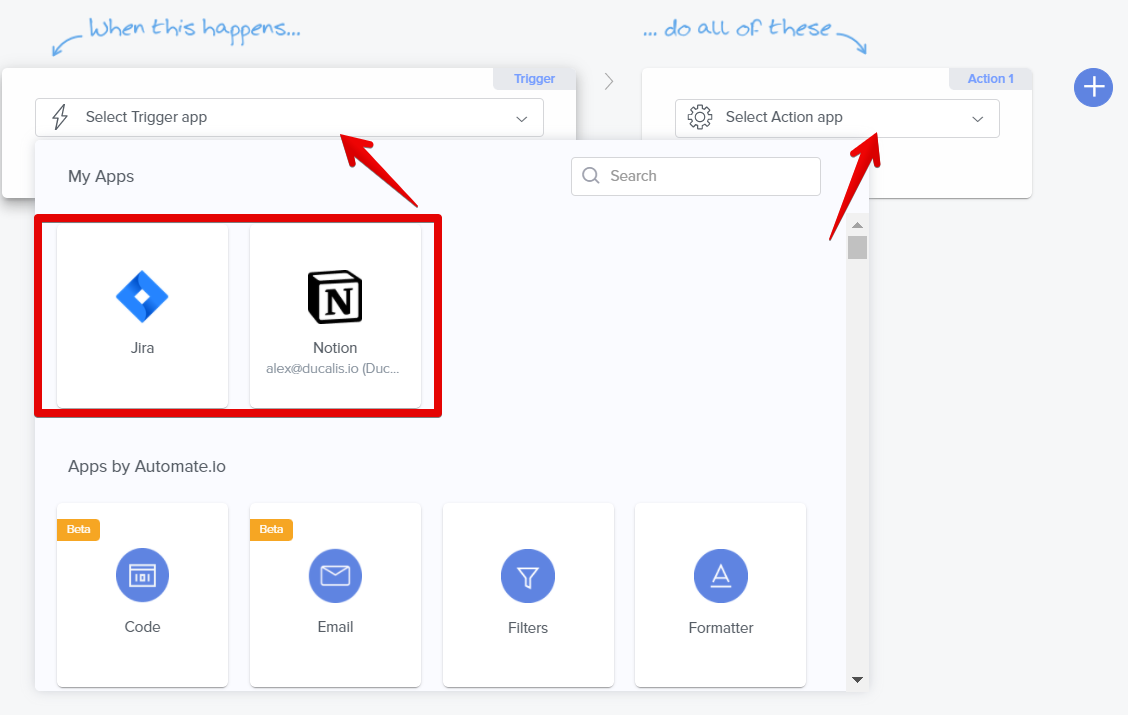
- Tetikleyici ve eylem uygulamaları için Jira veya Notion'ı seçin
- İstenen Tetikleyici ve Eylem olaylarını seçin
- Gerekli Input Fields'ı doldurun
- Gerekli Output Fields'ı doldurun
- Ek eylemler veya uygulamalar eklemek için artı işaretine tıklayın
- Botunuzu yapılandırmayı bitirdiğinizde Save'e tıklayın
- Botunuz Bots sekmesinin altında mevcuttur. Etkinleştirmek veya devre dışı bırakmak için anahtara tıklayın veya düzenlemek için bota tıklayın
Avantajlar ve dezavantajlar
Avantajlar:
- Kullanıcı dostu kullanıcı arayüzü
- Esneklik
- Bir kez ayarlayın ve gerektiğinde çalışır
Dezavantajlar:
- Jira ile yerel entegrasyon yok
- Üçüncü taraf otomasyon aracı gerektirir
- Otomasyon aracı için ek maliyet
- Teknik bilgisi olmayan kullanıcılar için kurmak zor olabilir
- Otomatik güncellemeleri planlayabilirsiniz ancak gerçek zamanlı senkronizasyon yok
- Ödeme modeli eylem/görev başınadır ve büyük ekipler veya büyük iş listeleri için pahalı olabilir
- Özellikle ekipler için kurulumu zaman alır
- Arama ve gezinme netlikten yoksundur
- Metin biçimlendirmesini kopyala/yapıştır iyi çalışmaz
Özel özellikler:
- İşleri, görevleri ve projeleri organize etmek için yerleşik özelleştirmeyle net kullanıcı arayüzü
- Farklı cihazlarda çalışır: web uygulaması, masaüstü uygulaması (Mac ve Windows), mobil uygulamalar (iOS ve Android)
- Sadece not almadan daha fazlasını sunan hepsi bir arada çözüm
- Özelleştirilebilir düzenler
- İşbirliği için kolay yol haritası paylaşımı
- Paydaş geri bildirimi için sınırsız görüntüleyici hesapları
- Büyük şablon kütüphanesi
3. Jira Cloud for Sheets eklentisi
Jira Cloud eklentisi, Jira'nın işlevselliğini Google Sheets'in esnekliğiyle birleştirir. Bu eklentiyi şunlar için kullanın:
- Favori kayıtlı veya yerleşik filtreleri kullanarak konuları hızlıca içe aktarın
- Özel bir işlev kullanarak JQL sorgularını doğrudan elektronik tablonuzda yazın
- Çeşitli projelerden ve Jira sitelerinden verileri birleştirin
- Otomatik veri güncellemelerini planlayın
Prosedür
-
İhtiyacınız olan konuları bulmak için filtreleri kullanın
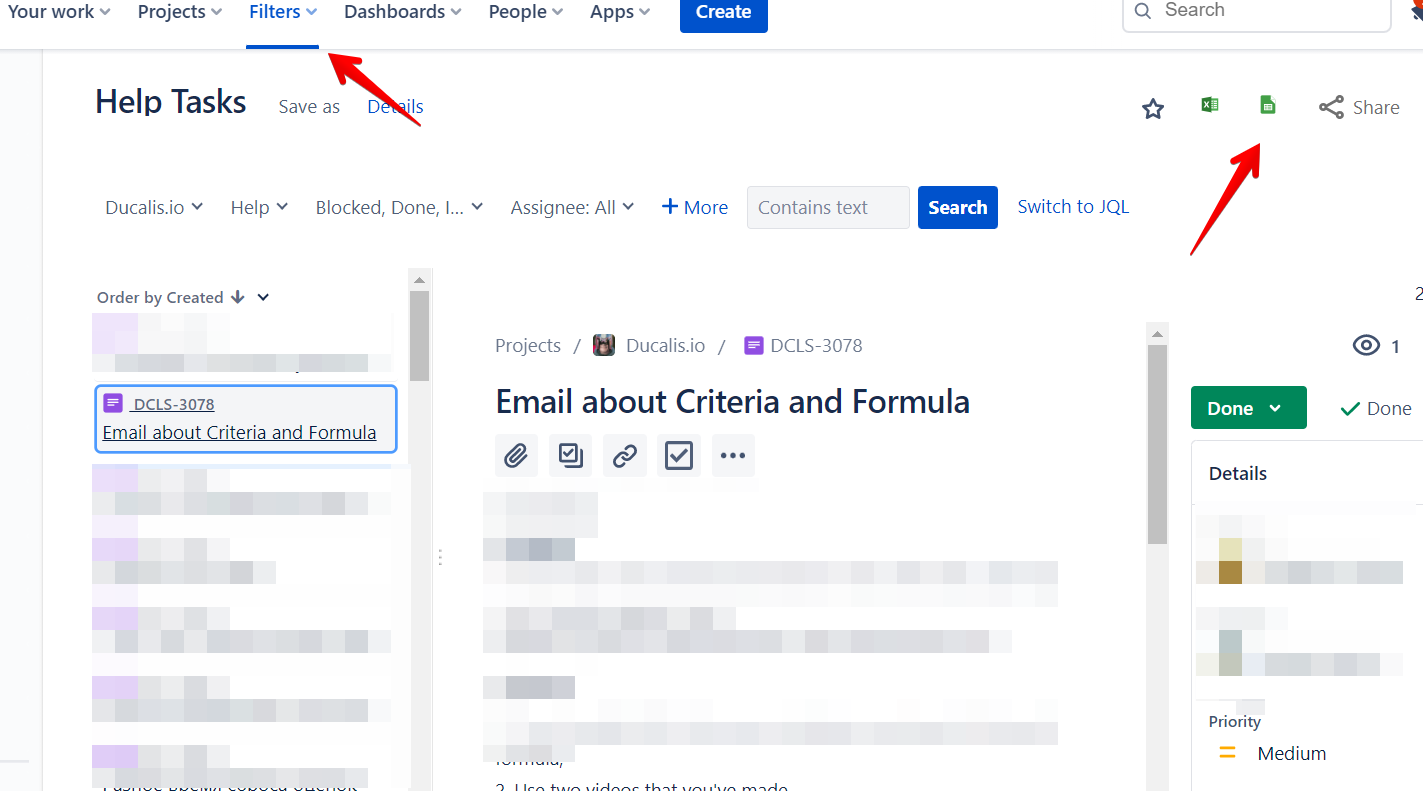
-
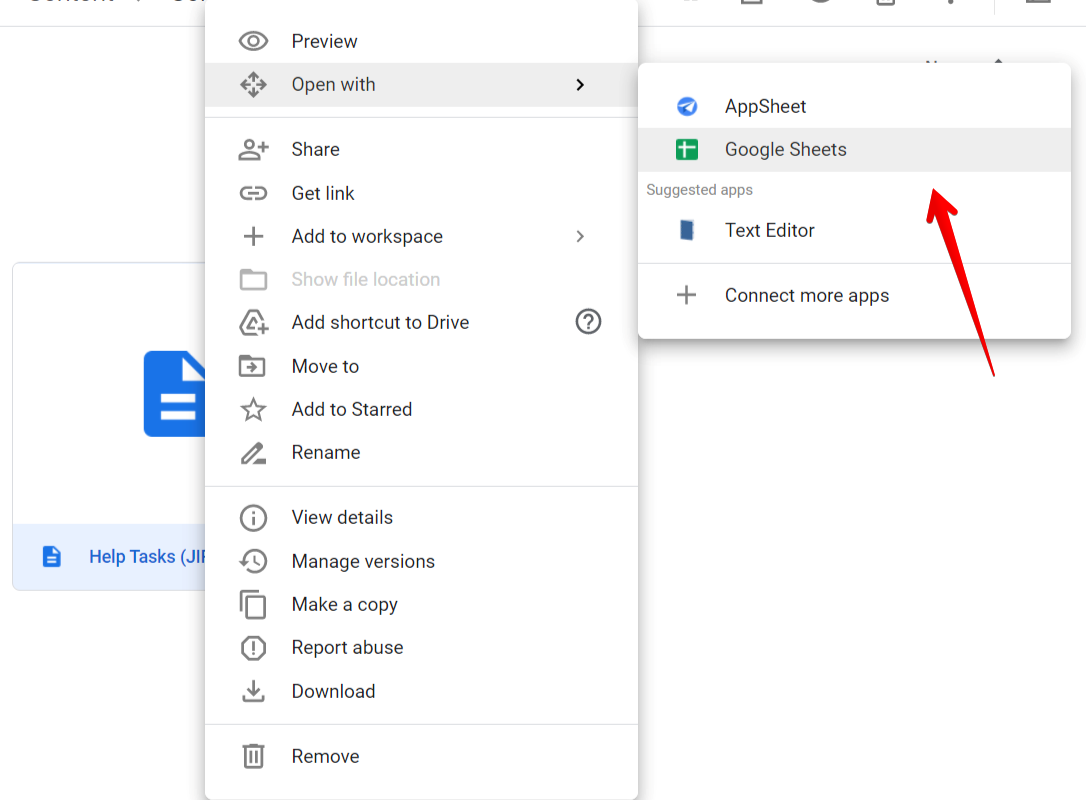
Google Sheets simgesine tıklayın
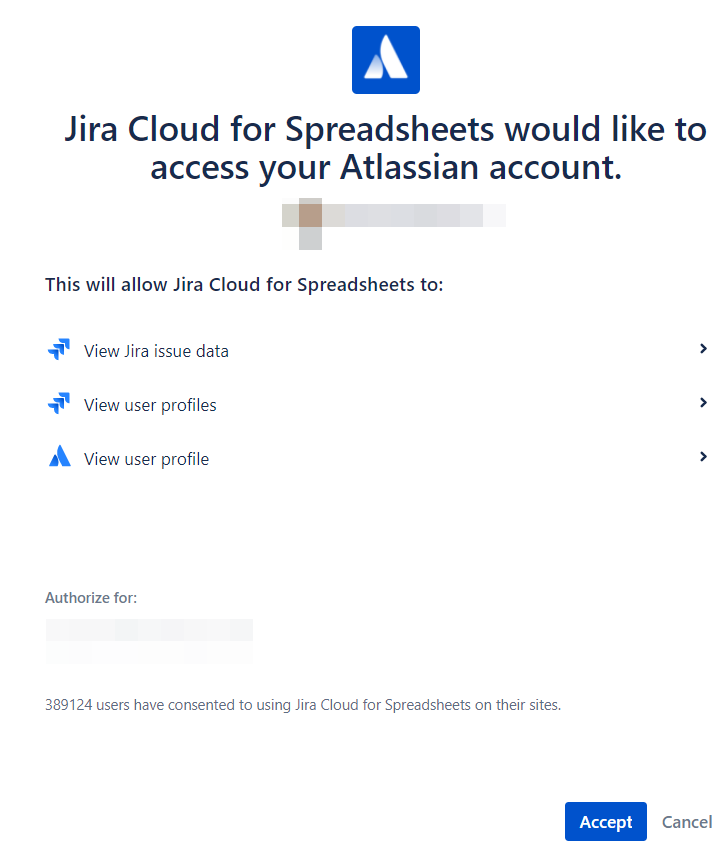
-
Eklentiyi ilk kez kullanıyorsanız, Jira Cloud for Spreadsheets'in Atlassian hesabınıza erişmesine izin verin
-
Bu, dışa aktarılan konuları Google Sheets'te açar
-
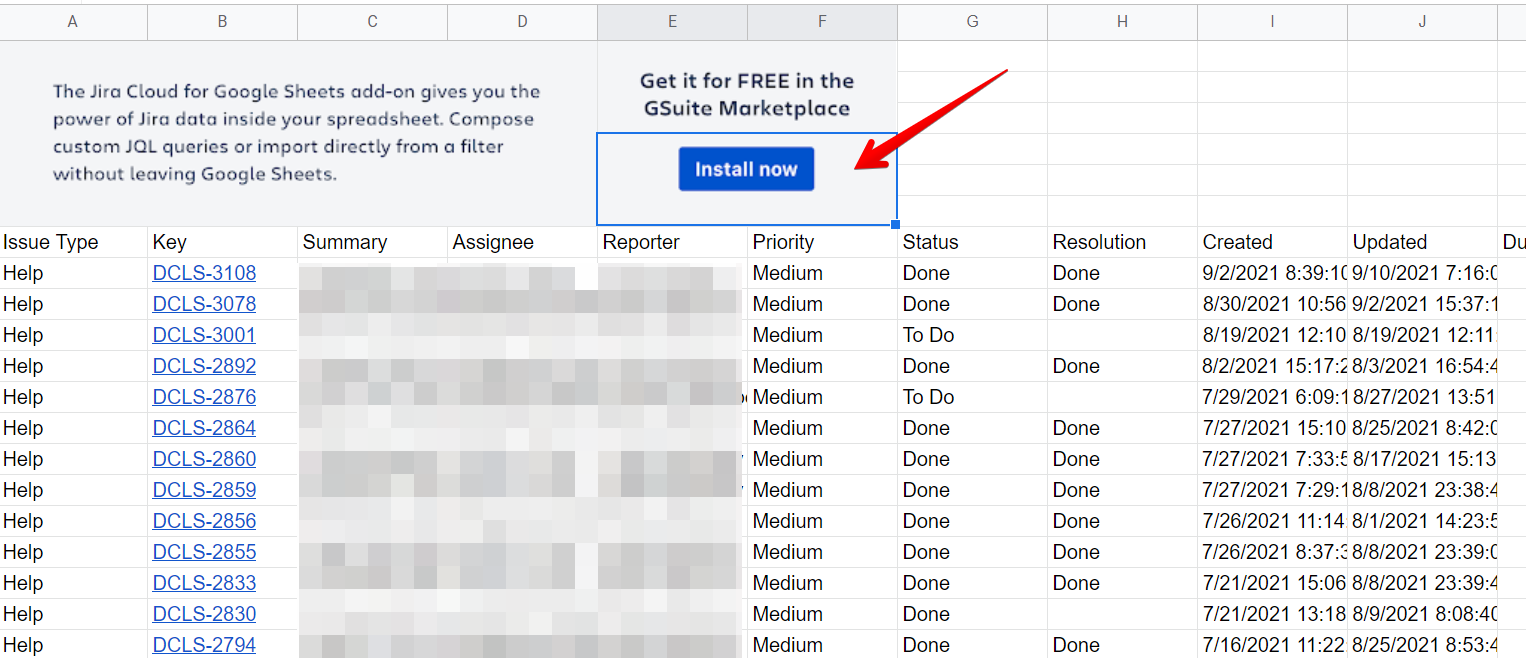
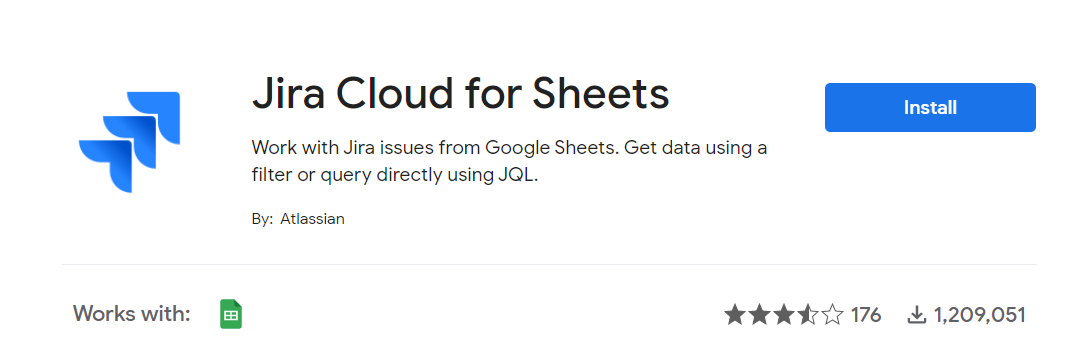
GSuite Marketplace'e gitmek ve Jira Cloud for Google Sheets eklentisini indirmek için Install Now (Şimdi Yükle) düğmesine tıklayın
-
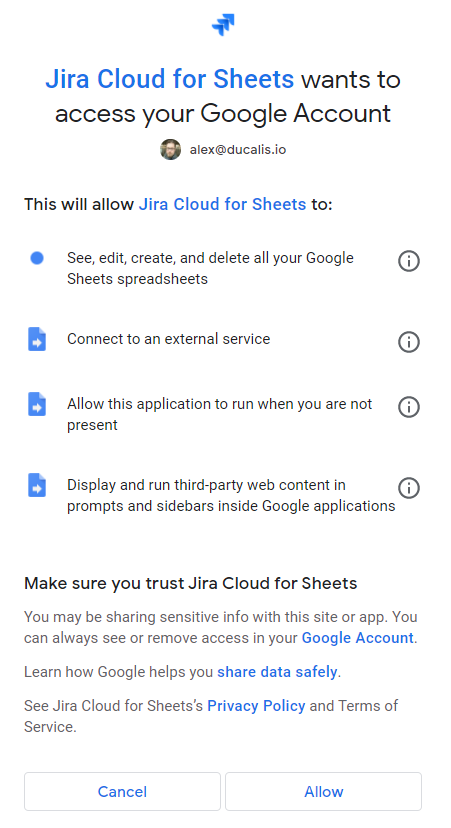
Google hesabınızla oturum açın ve izinleri kabul edin
-
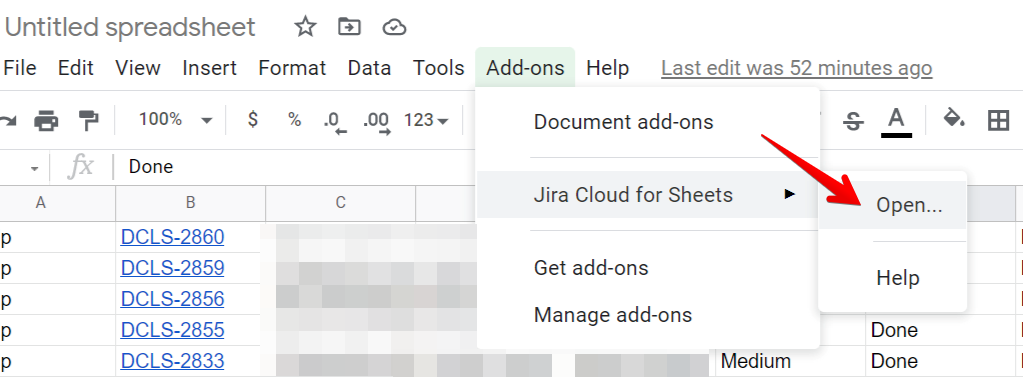
Google elektronik tablonuza dönün, Add-ons (Eklentiler) seçeneğini seçin, Jira Cloud for Sheets'i seçin ve Open (Aç) düğmesine tıklayın. Jira entegrasyonu hemen elektronik tablonun içinde açılır
-
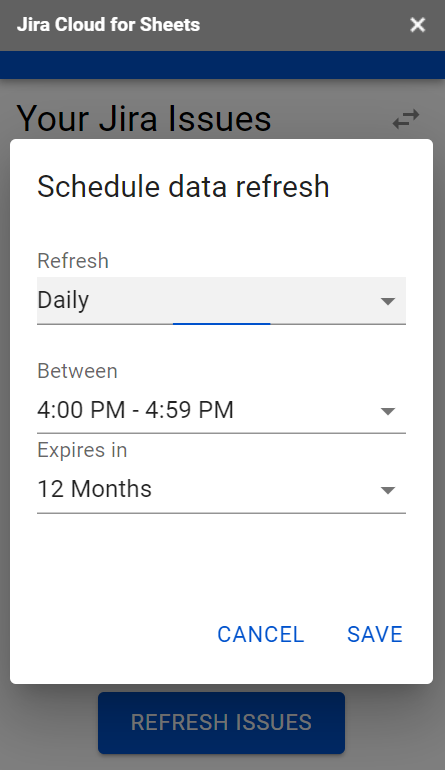
Jira entegrasyonu sağ taraf panelinde görünür. Get problems from Jira (Jira'dan konuları al) düğmesine tıkladıktan sonra Schedule data refresh (Veri yenilemeyi planla) seçeneğine gidin. Verilerinizin ne sıklıkta güncellenmesini istediğinizi seçin
-
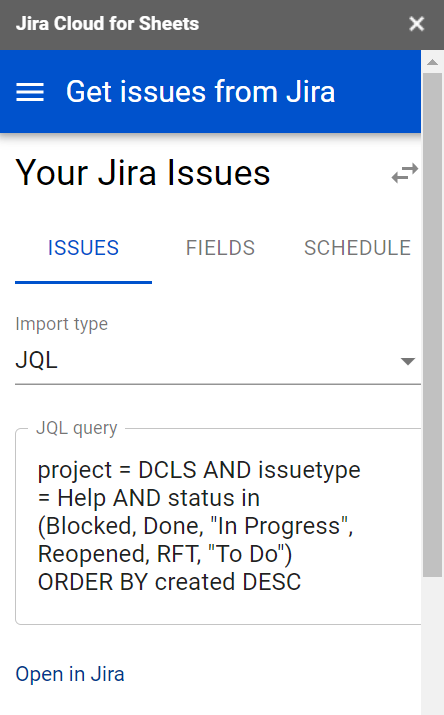
Eklenti aracılığıyla Jira'dan konuları içe aktarın ve sorgularınızı özelleştirmek için JQL (Jira Query Language) kullanın
Avantajlar ve dezavantajlar
Avantajlar:
- Ücretsiz
- Hızlı
- Google Sheets içinden konuları içe aktarabilir
- Google Sheets içinden sorguları ayarlayabilir
- Otomatik veri güncellemeleri için zamanlama ayarlayabilir
Dezavantajlar:
- Veriler arttıkça desteklemek ve sürdürmek zor
- Otomatik güncellemeleri planlayabilirsiniz ancak gerçek zamanlı senkronizasyon yok
- Ek özellik veya işlevsellik yok
4. CSV kullanarak manuel dışa aktarma
Jira'dan verileri manuel olarak dışa aktarın ve Google Sheets'e yükleyin.
Prosedür
-
İhtiyacınız olan konuları bulmak için filtreleri kullanın
-
Tüm dışa aktarma seçeneklerini görmek için Export (Dışa Aktar) düğmesine tıklayın
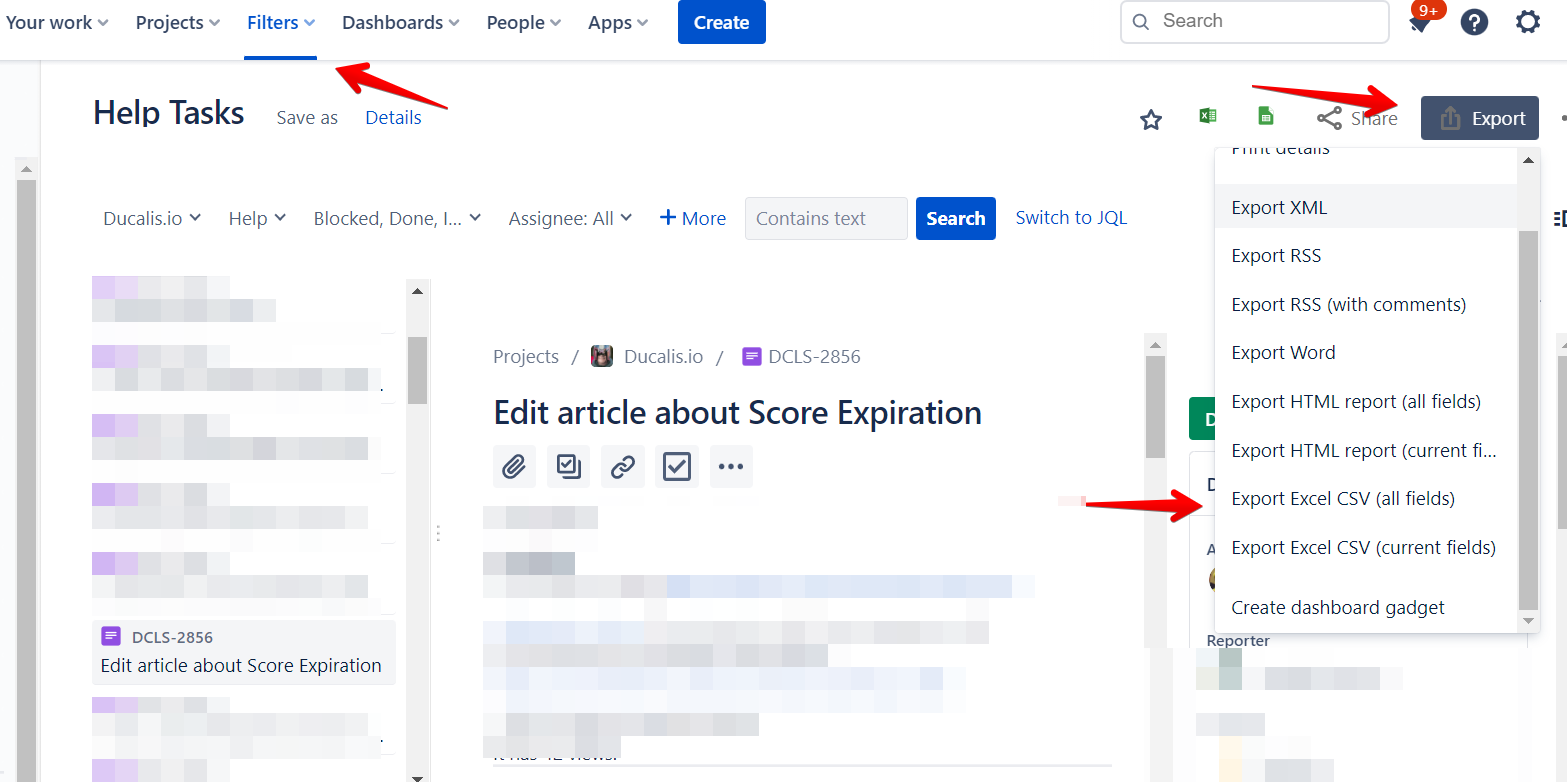
-
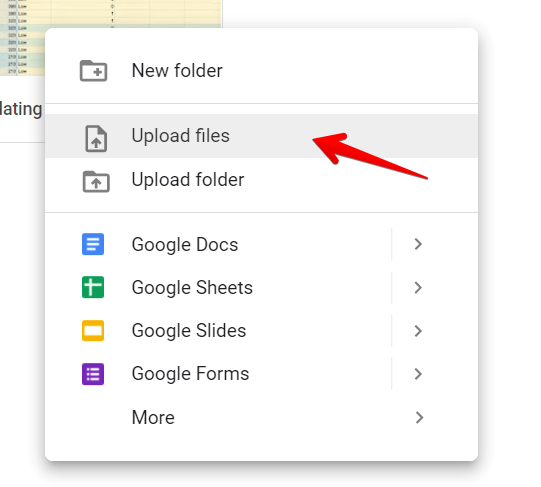
CSV dosyasını bilgisayarınıza indirin
-
CSV dosyasını Google Drive'ınıza yükleyin ve Google Sheets ile açın
Avantajlar ve dezavantajlar
Avantajlar:
- Ücretsiz
- Hızlı
Dezavantajlar:
- Veriler arttıkça desteklemek ve sürdürmek zor
- Gerçek zamanlı senkronizasyon yok – veriler manuel güncellemeler gerektirir, bu da zaman alıcıdır
- Ek özellik veya işlevsellik yok
Öneriler
Ducalis
En iyi seçenek:
- Zamandan tasarruf etmek ve önemli olana odaklanmak istiyorsanız
- Favori görev takipçinizle gerçek zamanlı 2 yönlü senkronizasyona ihtiyacınız varsa
- Ekibinizi işbirlikçi değerlendirme ve önceliklendirme ile güçlendirmek istiyorsanız
- Hedeflerinize göre uyarlanmış kriterler ve formüllerle özel önceliklendirme çerçeveleri oluşturmak istiyorsanız
- RICE, ICE, REAN, WSJF ve daha fazlası gibi çok çeşitli önceliklendirme modelleri istiyorsanız
- Ekibinizi hizalamak ve takım hizalanması ızgara özelliği aracılığıyla sorunlu alanları tespit etmek için bir araca ihtiyacınız varsa
Sonraki adım: Jira hesabınızla Ducalis bağlandıktan sonra, ihtiyaçlarınız için en uygun mevcut önceliklendirme çerçevelerinden birini seçin veya kendinizinkini oluşturun.
Airtable
En iyi seçenek:
- Veritabanı yeteneklerini elektronik tablo işlevselliğiyle birleştirmek istiyorsanız
- Teknik bilginiz varsa ve kendi uygulamalarınızı oluşturup özelleştirmek istiyorsanız
- Otomasyonları oluşturup özelleştirmek istiyorsanız
- Projeleri yönetmek için bir araca ihtiyacınız varsa
- Farklı projeler için büyük bir şablon kütüphanesi istiyorsanız
Sonraki adım: Jira hesabınızı Airtable ile bağladıktan sonra, iş listenizi Value-Complexity Matrix, Value-Risk Matrix veya MoSCoW Method'a göre önceliklendirin.
Coda.io
En iyi seçenek:
- Kelime işleme, elektronik tablolar ve veritabanlarını birleştirmek istiyorsanız
- Tek bir yerde farklı klasörler, projeler veya belgeler istiyorsanız
- Farklı türde görsel medya, grafikler, tablolar, haritalar kullanmak istiyorsanız
- Belgelerin yüksek esnekliğini ve özelleştirmesini istiyorsanız
- Farklı projeler için büyük bir şablon galerisi istiyorsanız
Sonraki adım: Jira hesabınızı Coda.io ile entegre ettikten sonra, bir önceliklendirme şablonu için galerilerini kontrol edin. İhtiyacınız olanı bulamazsanız, kendinizinkini oluşturun.
ProductPlan
En iyi seçenek:
- Açık ve görsel yol haritalarını kolayca oluşturmak istiyorsanız
- Sıfırdan veya şablonlardan oluşturabileceğiniz yüksek düzeyde özelleştirilebilir ve esnek yol haritalarına ihtiyacınız varsa
- Yol haritalarınızı işbirlikçiler ve paydaşlarla kolayca paylaşmak istiyorsanız
- Ürün yönetimi ve stratejilendirme için bir araca ihtiyacınız varsa
Sonraki adım: Jira hesabınızı ProductPlan ile entegre ettikten sonra, yol haritanızı ve iş listenizi önceliklendirmek için maliyet karşısında fayda önceliklendirme modelini kullanın.
Notion
En iyi seçenek:
- Jira ile entegrasyon için otomasyon yazılımınız varsa
- İşinizi, görevlerinizi, wikilerinizi ve projelerinizi organize etmek için kullanıcı dostu bir kullanıcı arayüzüne sahip bir yazılım arıyorsanız
- Her şeyin tek bir yerde olması için hepsi bir arada bir çözüm arıyorsanız
- İşinize bir web uygulaması, masaüstü uygulaması veya mobil uygulama aracılığıyla her yerden erişmek istiyorsanız
Sonraki adım: Notion-Jira entegrasyonunu kurduktan sonra, kendi önceliklendirme sisteminizi oluşturmak için Notion formüllerini kullanın.
Jira Cloud for Sheets eklentisi
En iyi seçenek:
- Google Sheets ve Jira arasındaki entegrasyonu otomatikleştirmek için ücretsiz ve hızlı bir yol arıyorsanız
- Google Sheets içinden özel Jira sorguları yazmak ve ayarlamak istiyorsanız
- Küçükten orta miktarda veriniz varsa
Sonraki adım: İş listenizi ücretsiz Weighted Decision Matrix Google Sheets şablonu ile önceliklendirin.
Manuel CSV dışa aktarma
En iyi seçenek:
- Ara sıra Jira verilerini Google Sheets'e dışa aktarıyorsanız
- Küçükten orta miktarda veriniz varsa
- Otomatik güncellemelere ihtiyacınız yoksa
- Ücretsiz, hızlı ve basit bir yol arıyorsanız
Sonraki adım: Jira iş listenizi Google Sheets ile entegre ettikten sonra, kendi özel önceliklendirmenizi oluşturun veya çevrimiçi uygun bir şablon bulun. Ücretsiz Weighted Decision Matrix Google Sheets şablonu edinin.